4. Debian 12 Application
Account: linaro Password: linaro
4.1 Serial Terminal
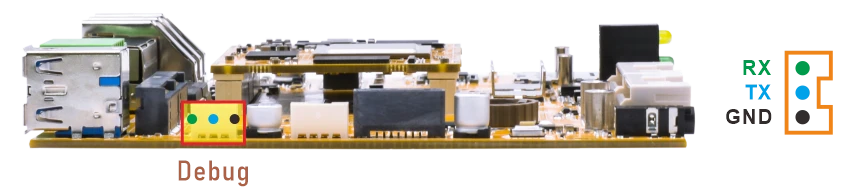
Connect the board and PC with USB Serial cable, then power on, the terminal will output boot information. The default baudrate is 1500000.
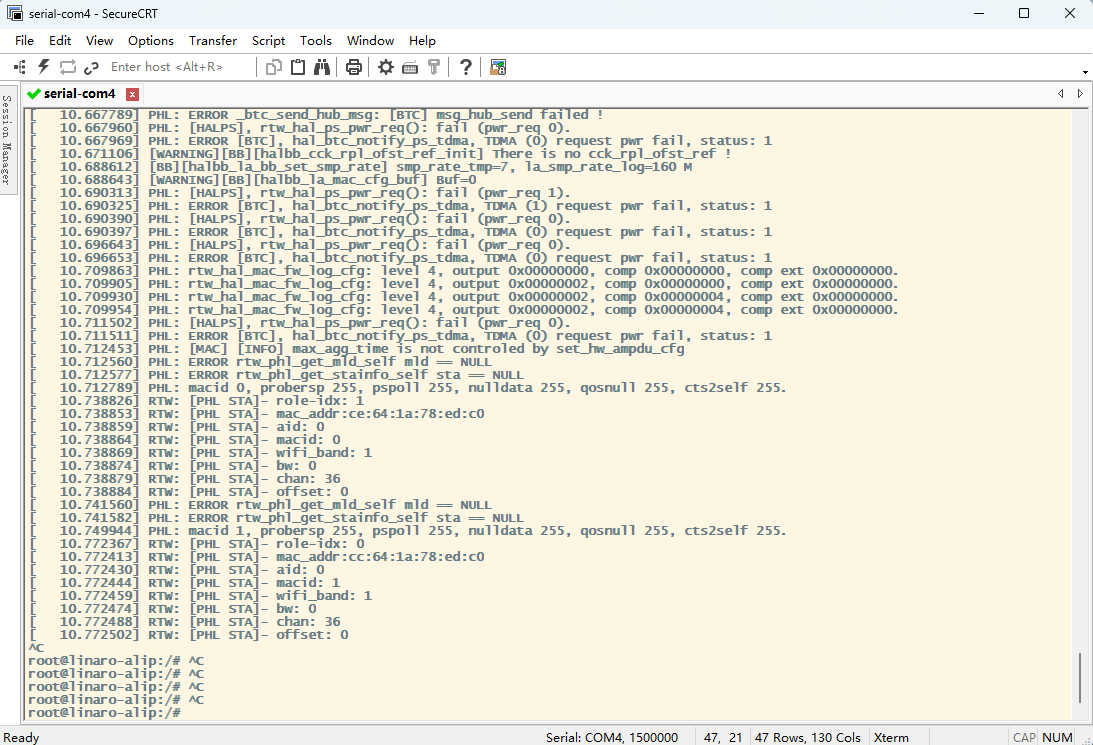
Serial Terminal
4.2 Display
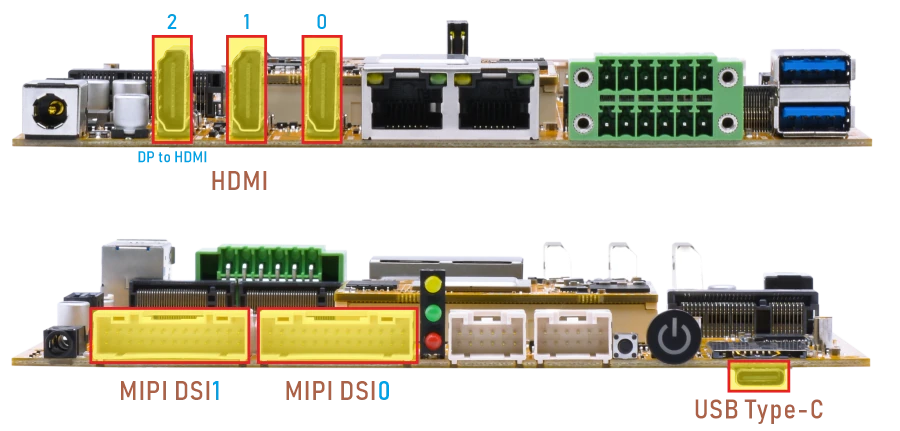
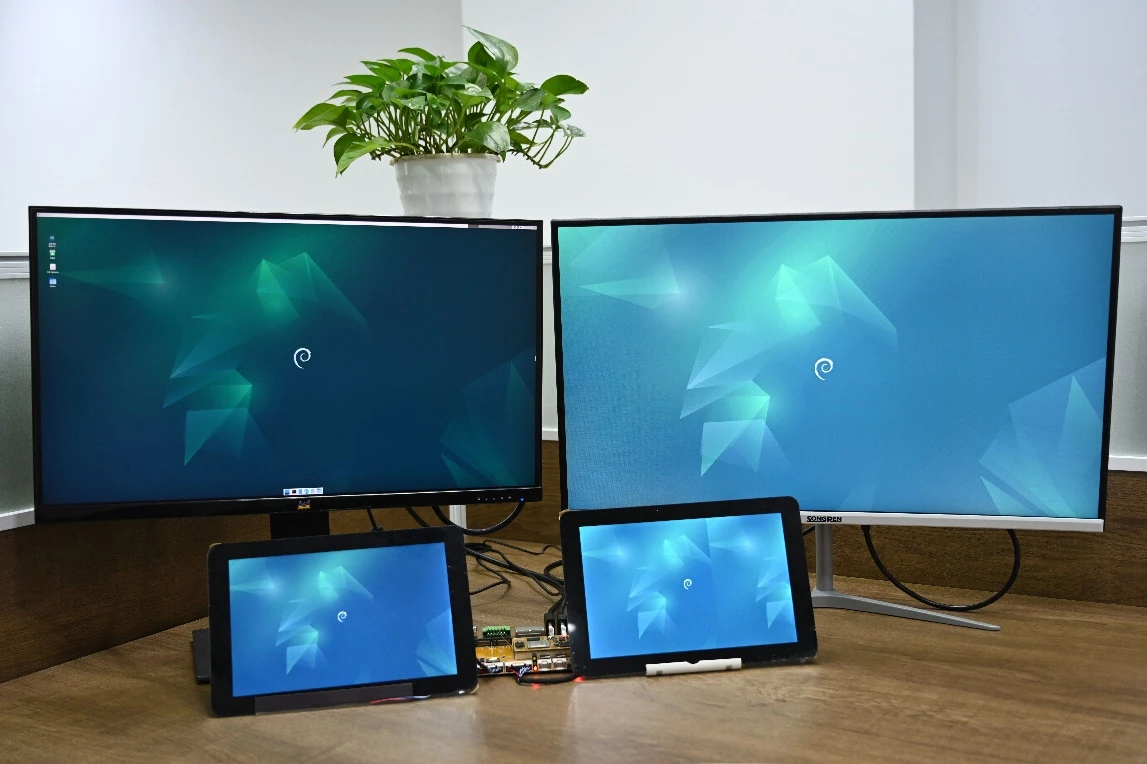
Under Linux, the EM3588 supports simultaneous output to up to four displays. With six physical display interfaces available, users can flexibly configure the output mapping as needed.
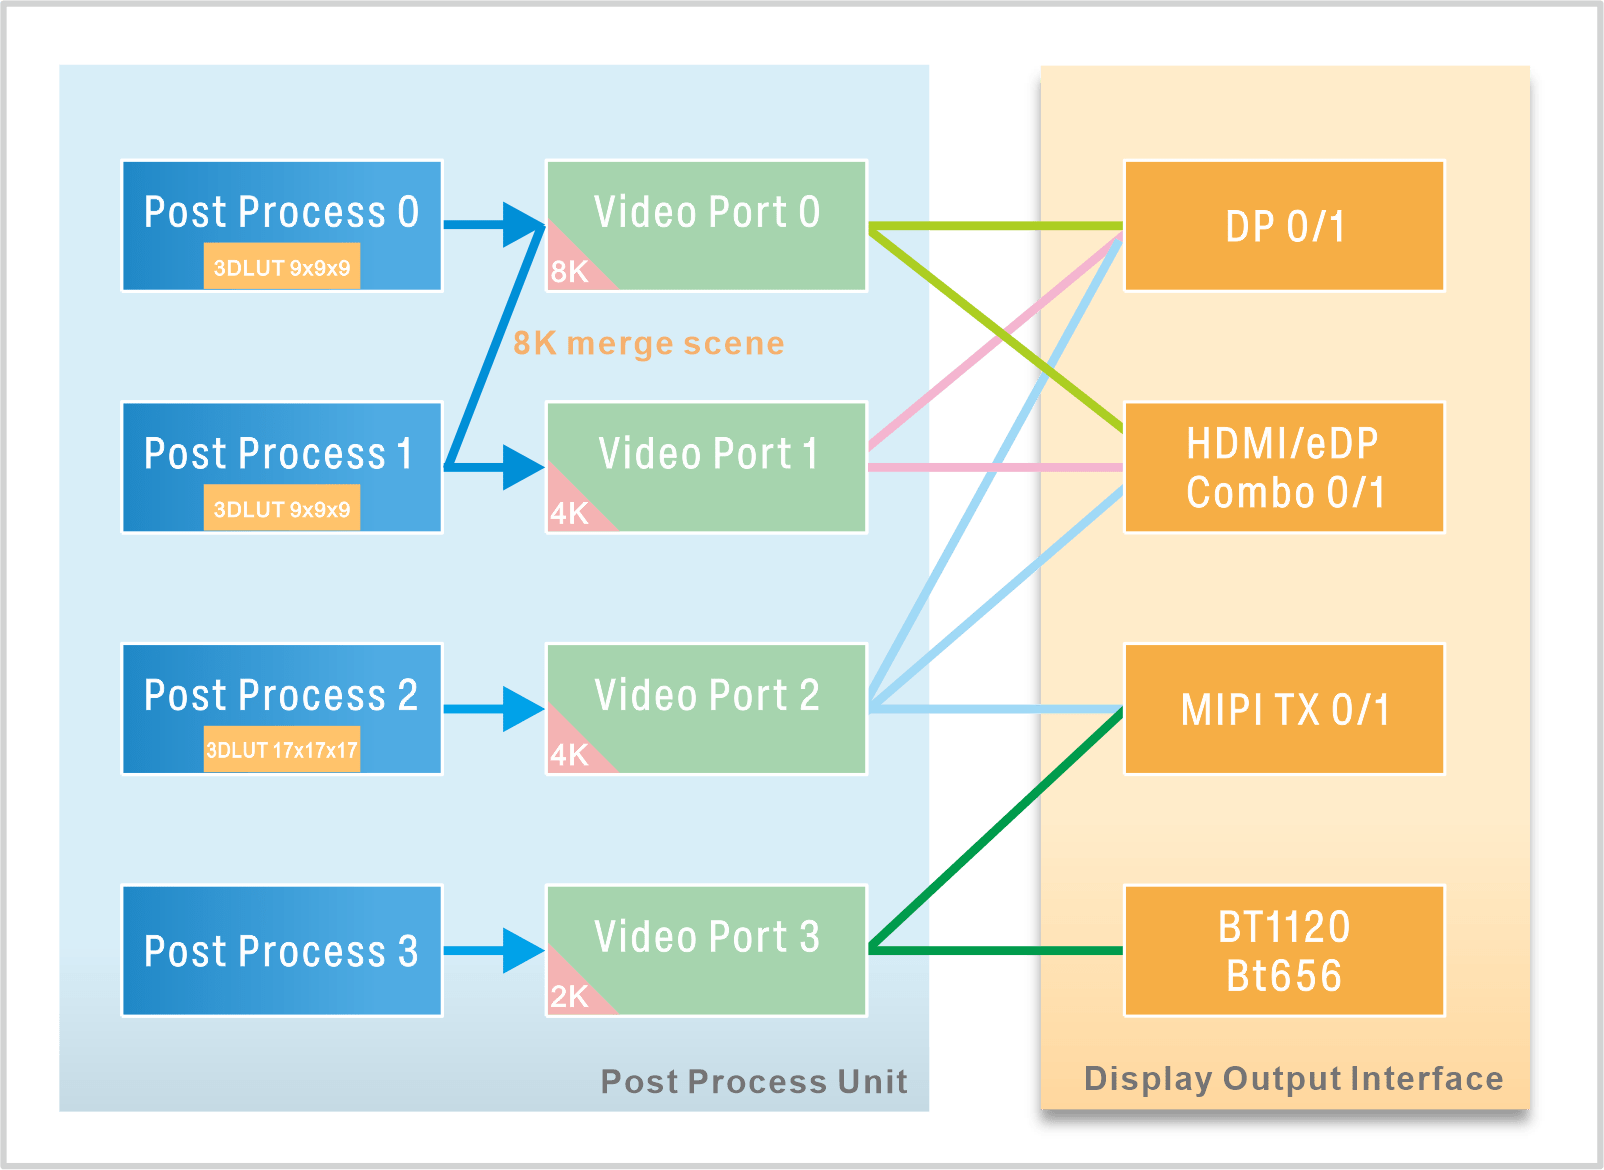
RK3588 Display Output Mapping
4.3 USB Type-C
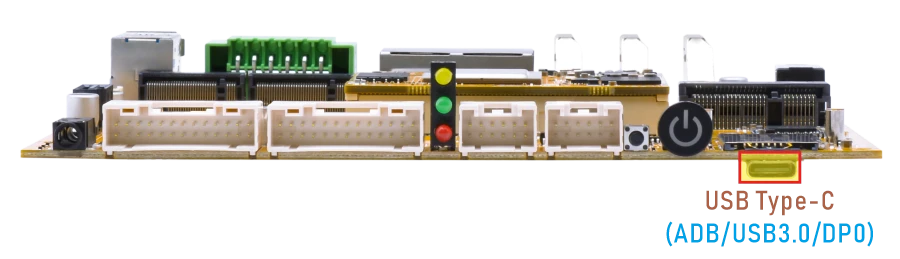
Features supported by the USB-C interface:
Reversible Design: Allows insertion in either orientation for user convenience.
Data Transmission Roles: Supports flexible designation of host and device roles.
Multiple Protocol Support: Compatible with USB 3.0 and DisplayPort, enabling high-speed data transmission.
4.3.1 ADB
❶ Connect the board and PC host with USB-C cable.
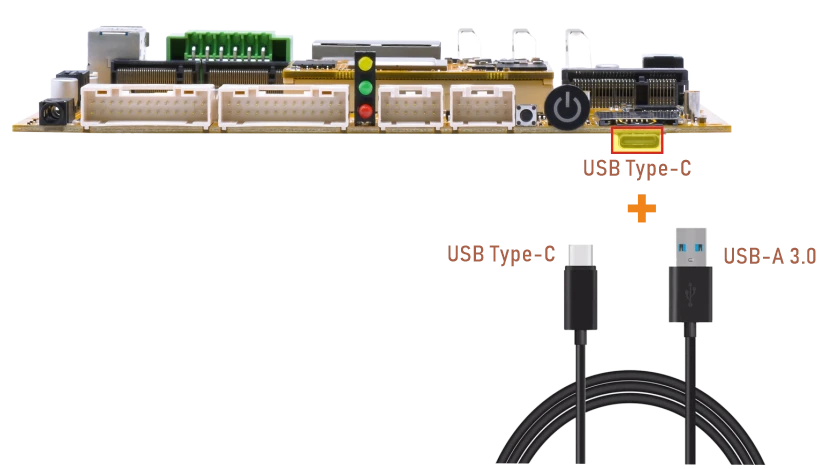
❷ Install ADB driver on Windows system.
❸ Press Windows + R to open the Run program. Type cmd and press Enter
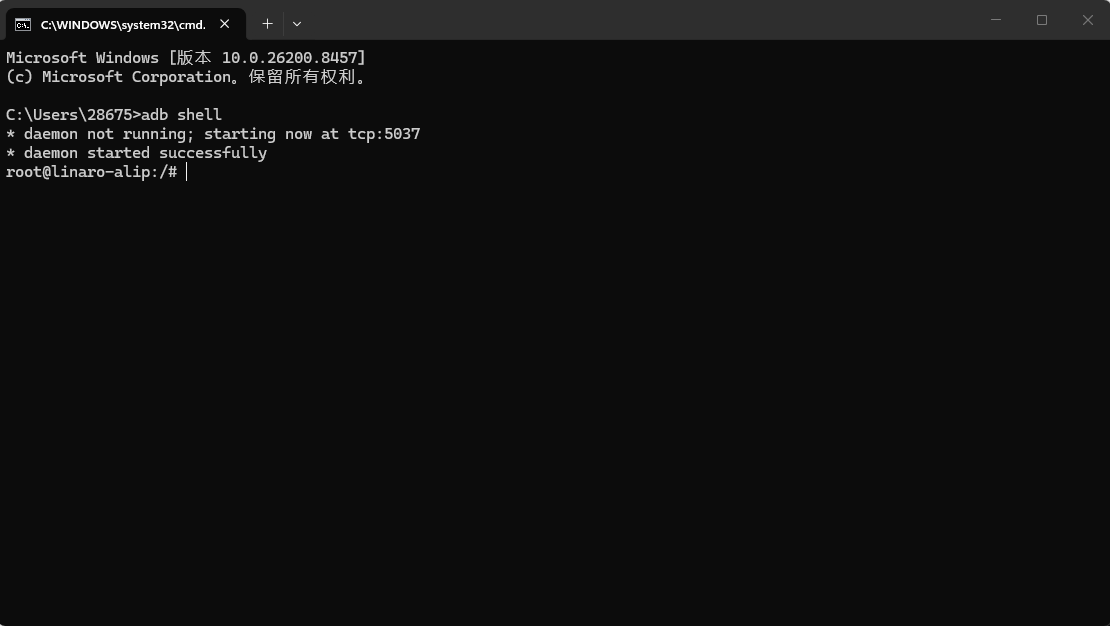
❹ Execute the follow commands to enable ADB.
1adb shell
4.3.2 USB Host
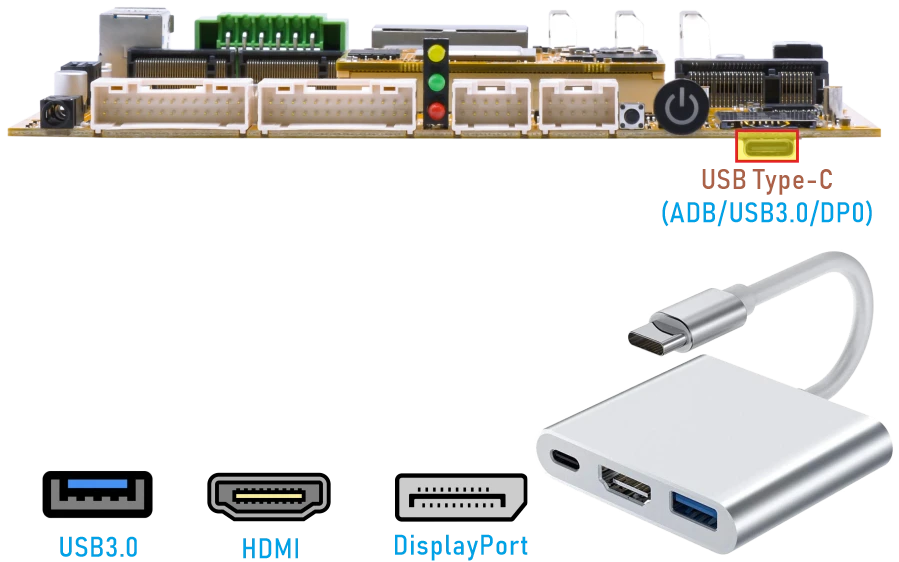
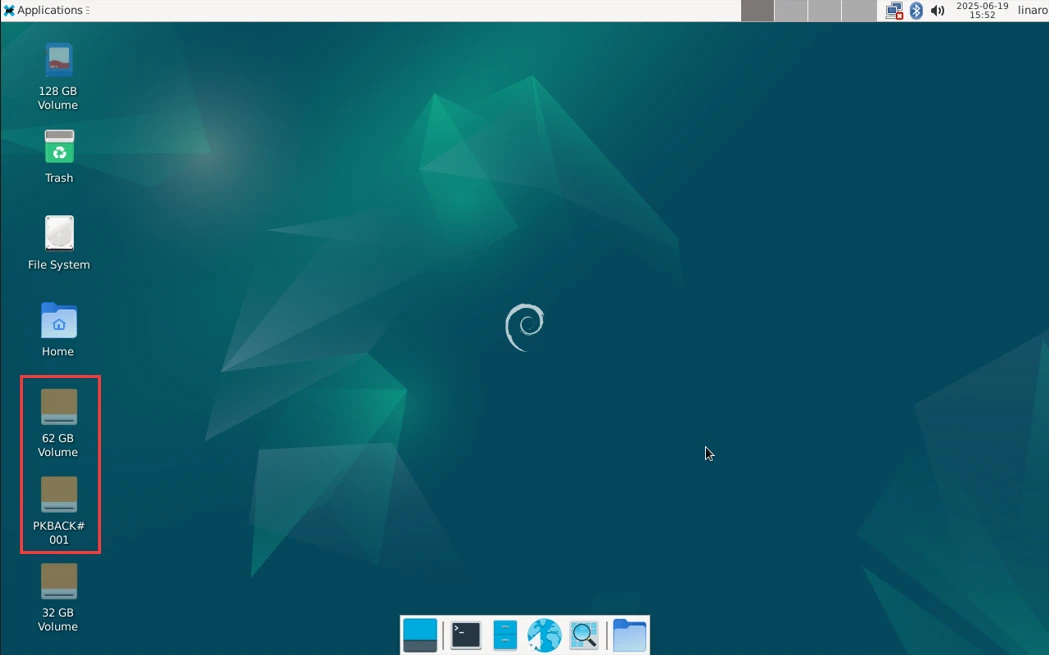
The EM3588 USB Type-C port supports USB 3.0 host mode through a USB-C to USB-A adapter. After a USB flash drive is inserted, an icon appears on the Debian desktop. Click the icon to mount the drive automatically.
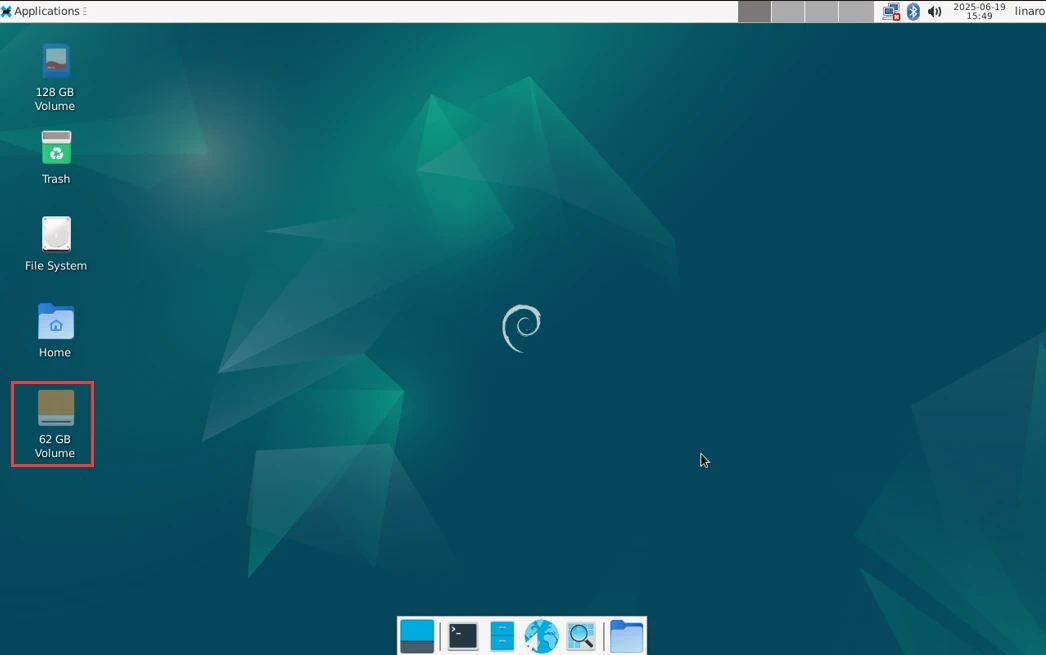
Mounted U-disk
4.3.3 DP Alt Mode
DisplayPort Alternate Mode (DP Alt Mode) is a technology that facilitates the transmission of DisplayPort video signals through a USB Type-C interface. It enables devices to output video and audio via a USB-C connection without requiring a dedicated DisplayPort connector. This allows users to connect a display using a single USB-C port while transmitting video, audio, and additional data.
Boardcon has conducted the testing at USB-C to HDMI/DP (3840 x 2160 @ 60fps).
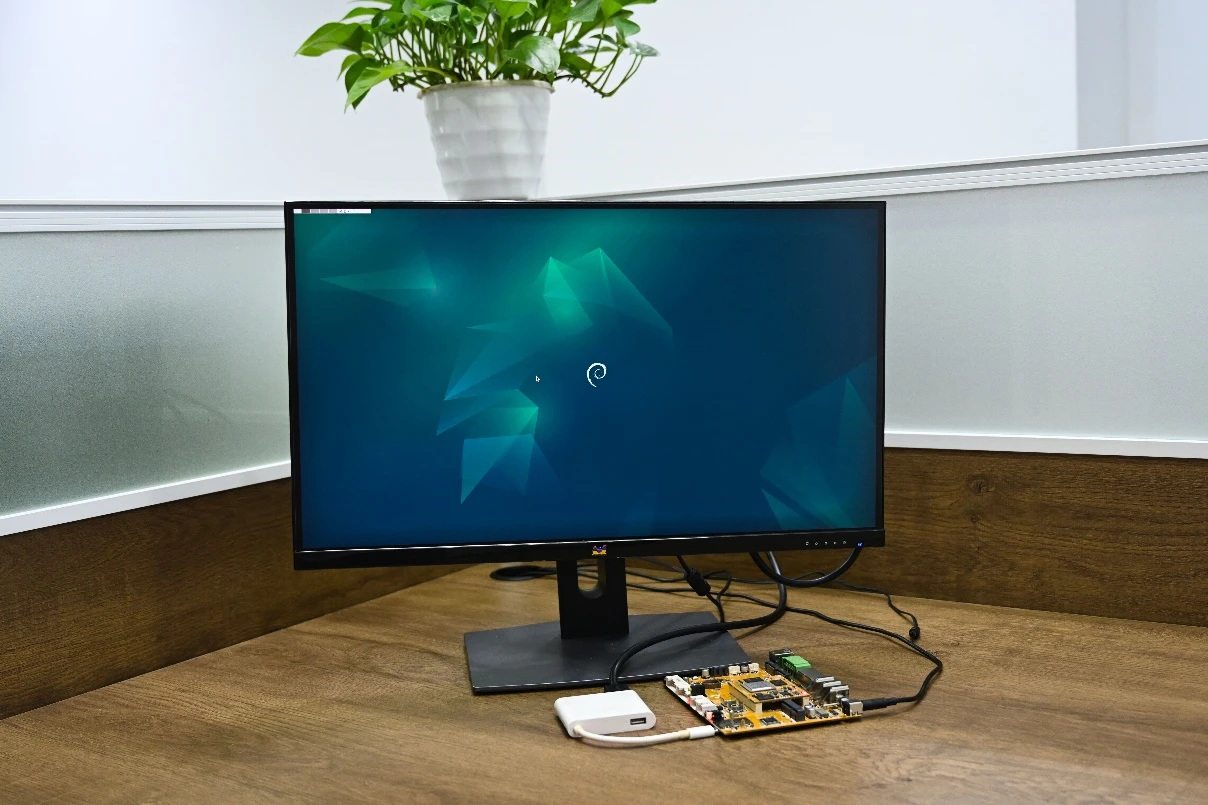
USB-C to HDMI
4.4 USB-A (USB3.0 Host)
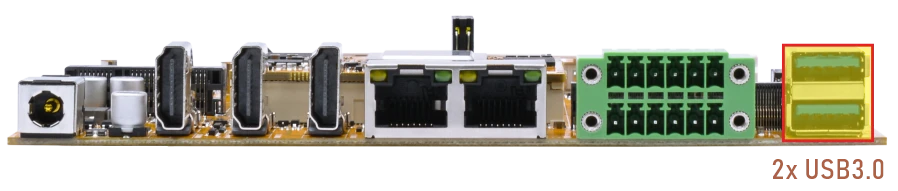
After a USB flash drive is inserted, an icon appears on the Debian desktop. Click the icon to mount the drive automatically.
4.5 Ethernet
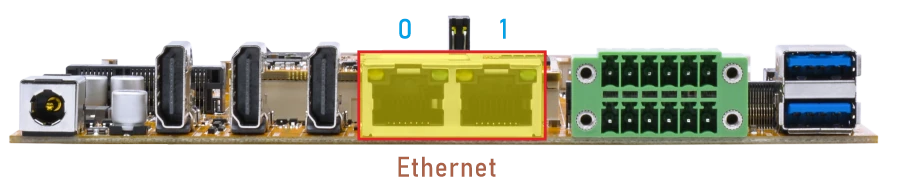
❶ Connect both Ethernet ports on the development board to the router using Ethernet cables.
The log shows that the Gigabit Ethernet link has been successfully established.
root@linaro-alip:/#
[  257.097915] rk_gmac-dwmac fe1c0000.ethernet end1: Link is Up - 1Gbps/Full - flow control rx/tx
[  257.097991] IPv6: ADDRCONF(NETDEV_CHANGE): end1: link becomes ready
[  264.756122] systemd-journald[312]: Time jumped backwards, rotating.
❷ View the status of the Network interface.
1ifconfig
root@linaro-alip:/# ifconfig
eth0: flags=4163<UP,BROADCAST,RUNNING,MULTICAST>  mtu 1500
        inet 192.168.0.55  netmask 255.255.255.0  broadcast 192.168.0.255
        inet6 fe80::f9cb:8340:3cf4:22e2  prefixlen 64  scopeid 0x20<link>
        ether 56:0d:96:f9:98:96  txqueuelen 1000  (Ethernet)
        RX packets 567  bytes 60814 (59.3 KiB)
        RX errors 0  dropped 68  overruns 0  frame 0
        TX packets 15  bytes 1556 (1.5 KiB)
        TX errors 0  dropped 0 overruns 0  carrier 0  collisions 0
        device interrupt 75

eth1: flags=4163<UP,BROADCAST,RUNNING,MULTICAST>  mtu 1500
        inet 192.168.0.152  netmask 255.255.255.0  broadcast 192.168.0.255
        inet6 fe80::2664:e8eb:922f:5e8d  prefixlen 64  scopeid 0x20<link>
        ether 5a:0d:96:f9:98:96  txqueuelen 1000  (Ethernet)
        RX packets 779  bytes 80883 (78.9 KiB)
        RX errors 0  dropped 79  overruns 0  frame 0
        TX packets 172  bytes 15392 (15.0 KiB)
        TX errors 0  dropped 0 overruns 0  carrier 0  collisions 0
        device interrupt 73
❸ Test network connectivity.
1ping -I end0 www.armdesigner.com
2ping -I eth1 www.armdesigner.com
root@linaro-alip:/# ping -I eth0 www.armdesigner.com
PING www.armdesigner.com (67.222.54.196) from 192.168.0.55 eth0: 56(84) bytes of data.
64 bytes from 67-222-54-196.unifiedlayer.com (67.222.54.196): icmp_seq=1 ttl=50 time=190 ms
64 bytes from 67-222-54-196.unifiedlayer.com (67.222.54.196): icmp_seq=1 ttl=50 time=190 ms (DUP!)
64 bytes from 67-222-54-196.unifiedlayer.com (67.222.54.196): icmp_seq=2 ttl=50 time=191 ms
64 bytes from 67-222-54-196.unifiedlayer.com (67.222.54.196): icmp_seq=2 ttl=50 time=191 ms (DUP!)
64 bytes from 67-222-54-196.unifiedlayer.com (67.222.54.196): icmp_seq=3 ttl=50 time=191 ms
64 bytes from 67-222-54-196.unifiedlayer.com (67.222.54.196): icmp_seq=3 ttl=50 time=191 ms (DUP!)
64 bytes from 67-222-54-196.unifiedlayer.com (67.222.54.196): icmp_seq=4 ttl=50 time=190 ms
64 bytes from 67-222-54-196.unifiedlayer.com (67.222.54.196): icmp_seq=4 ttl=50 time=190 ms (DUP!)
64 bytes from 67-222-54-196.unifiedlayer.com (67.222.54.196): icmp_seq=5 ttl=50 time=191 ms
64 bytes from 67-222-54-196.unifiedlayer.com (67.222.54.196): icmp_seq=5 ttl=50 time=191 ms (DUP!)
^C
--- www.armdesigner.com ping statistics ---
5 packets transmitted, 5 received, +5 duplicates, 0% packet loss, time 4006ms
rtt min/avg/max/mdev = 190.476/190.664/190.915/0.194 ms
root@linaro-alip:/#
root@linaro-alip:/# ping -I eth1 www.armdesigner.com
PING www.armdesigner.com (67.222.54.196) from 192.168.0.152 eth1: 56(84) bytes of data.
64 bytes from 67-222-54-196.unifiedlayer.com (67.222.54.196): icmp_seq=1 ttl=50 time=192 ms
64 bytes from 67-222-54-196.unifiedlayer.com (67.222.54.196): icmp_seq=1 ttl=50 time=192 ms (DUP!)
64 bytes from 67-222-54-196.unifiedlayer.com (67.222.54.196): icmp_seq=2 ttl=50 time=191 ms
64 bytes from 67-222-54-196.unifiedlayer.com (67.222.54.196): icmp_seq=2 ttl=50 time=191 ms (DUP!)
64 bytes from 67-222-54-196.unifiedlayer.com (67.222.54.196): icmp_seq=3 ttl=50 time=191 ms
64 bytes from 67-222-54-196.unifiedlayer.com (67.222.54.196): icmp_seq=3 ttl=50 time=191 ms (DUP!)
64 bytes from 67-222-54-196.unifiedlayer.com (67.222.54.196): icmp_seq=4 ttl=50 time=191 ms
64 bytes from 67-222-54-196.unifiedlayer.com (67.222.54.196): icmp_seq=4 ttl=50 time=191 ms (DUP!)
64 bytes from 67-222-54-196.unifiedlayer.com (67.222.54.196): icmp_seq=5 ttl=50 time=191 ms
64 bytes from 67-222-54-196.unifiedlayer.com (67.222.54.196): icmp_seq=5 ttl=50 time=191 ms (DUP!)
^C
--- www.armdesigner.com ping statistics ---
5 packets transmitted, 5 received, +5 duplicates, 0% packet loss, time 4006ms
rtt min/avg/max/mdev = 190.619/190.972/191.992/0.512 ms
4.6 SD Card
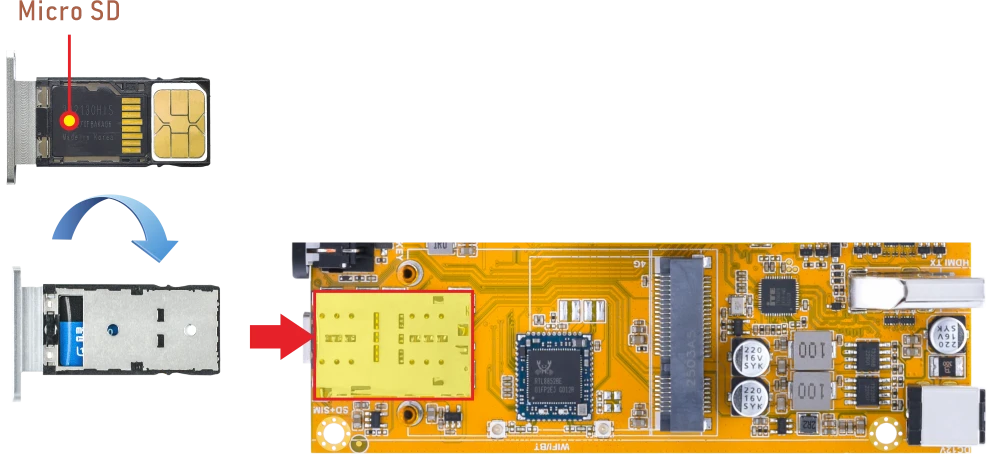
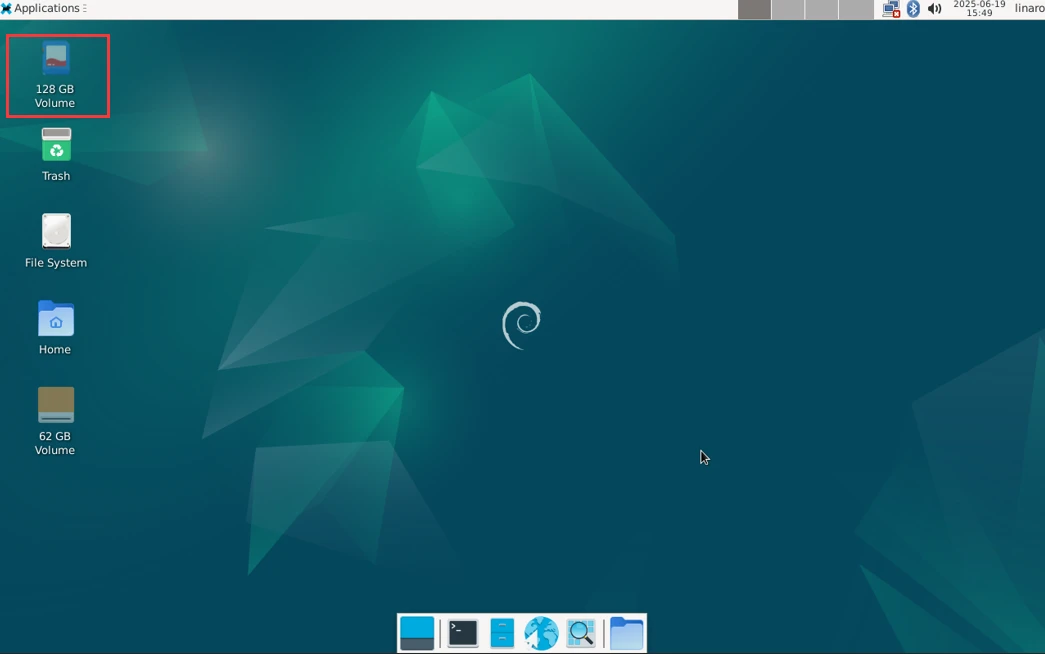
After a microSD card is inserted, an icon appears on the desktop. Click the icon to mount the card automatically.
4.7 SATA
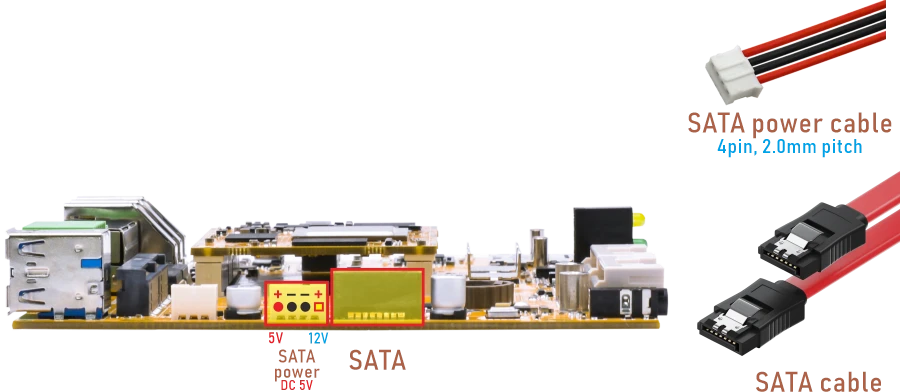
❶ Connect SATA and SATA power(5V).
❷ Power on.
❸ Format SATA to ext4. If the device is in ext4 format, skip this step.
1mke2fs -t ext4 /dev/sda
Warning
This operation will permanently erase all existing data on the selected partition. Before running the command below, double‑check that the device path is correct.
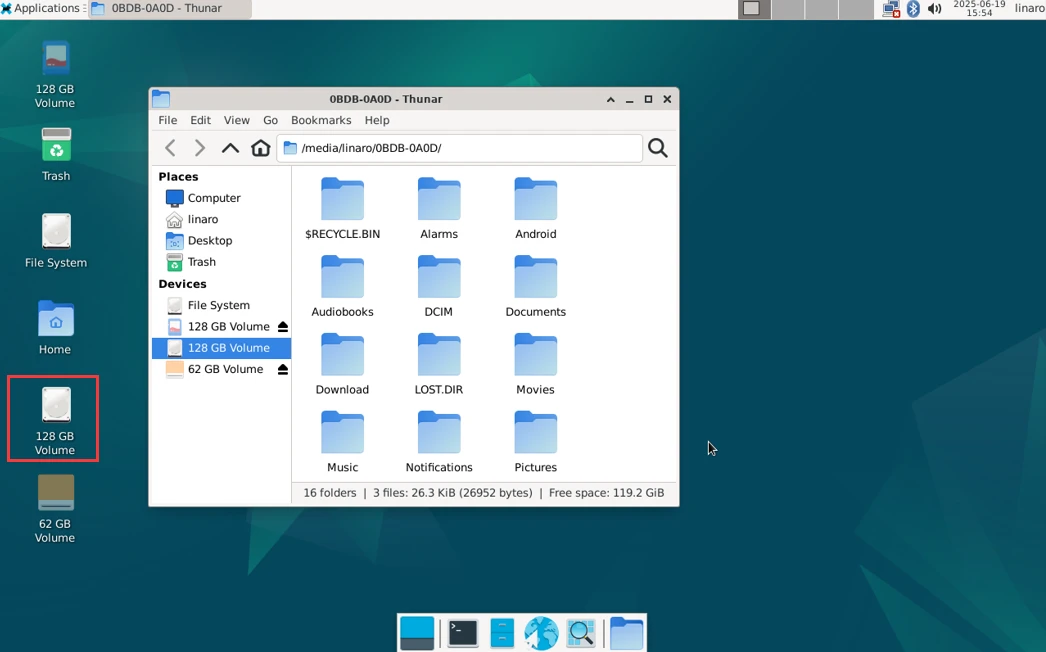
❹ If the SATA drive is successfully recognized, an icon will appear on the Debian desktop. Click the icon, and the drive will be mounted automatically.
4.8 M.2 SSD
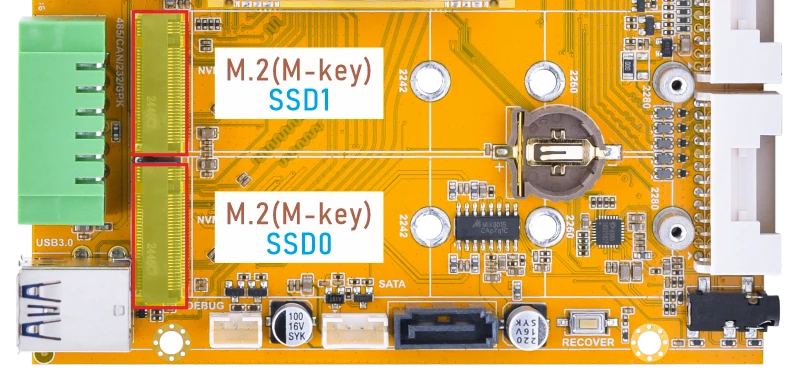
EM3588 only supports SSD in ext4 format.
❶ Insert the SSD into the M.2 slot.
❷ Power on.
❸ Format SSD to ext4. If the device is in ext4 format, skip this step.
1mke2fs -t ext4 /dev/nvme0n1p1
/dev/nvme0n1p1 for SSD0
/dev/nvme1n1p1 for SSD1
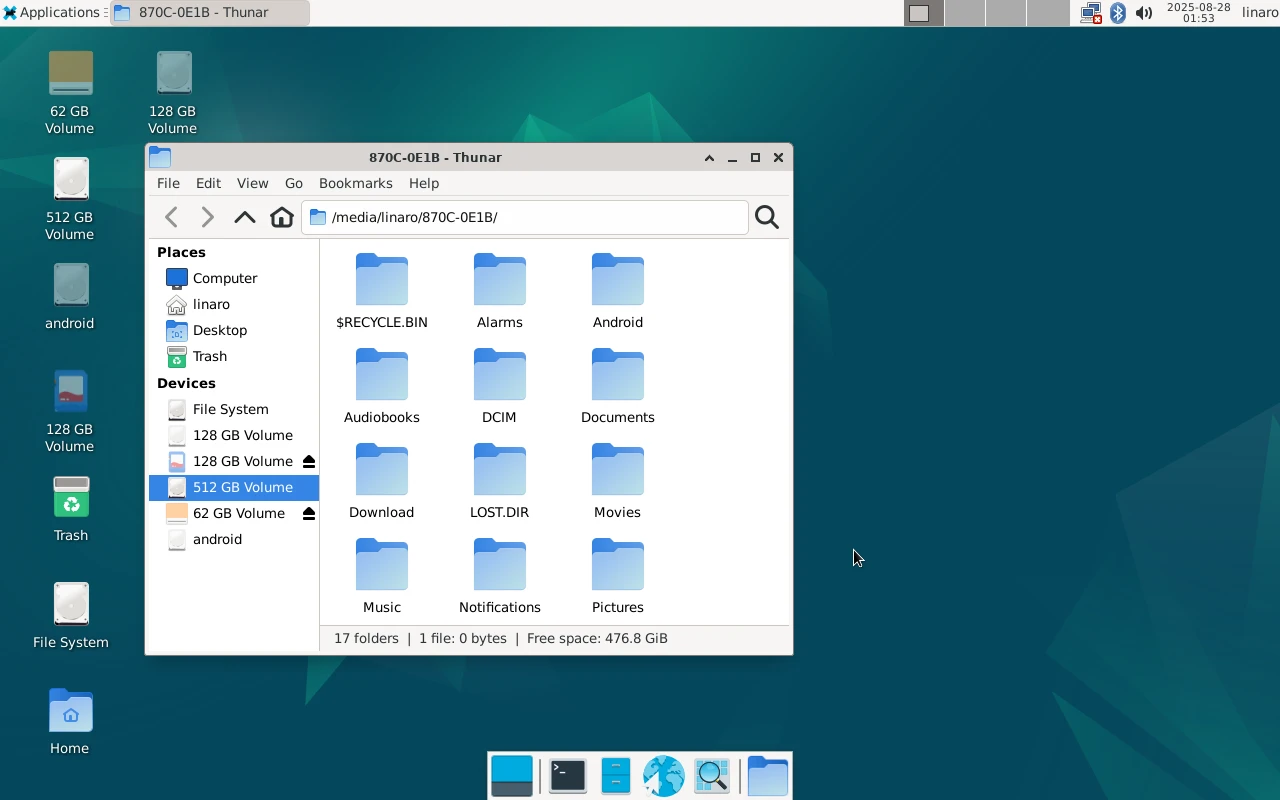
❹ If the SSD is successfully recognized, an icon will appear on the Debian desktop. Click the icon, and the drive will be mounted automatically.
4.9 WiFi & Bluetooth
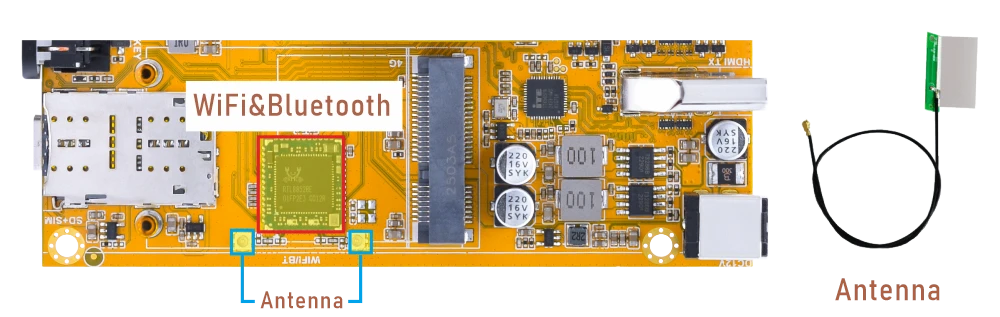
4.9.1 WiFi
❶ Connect the WiFi antenna.
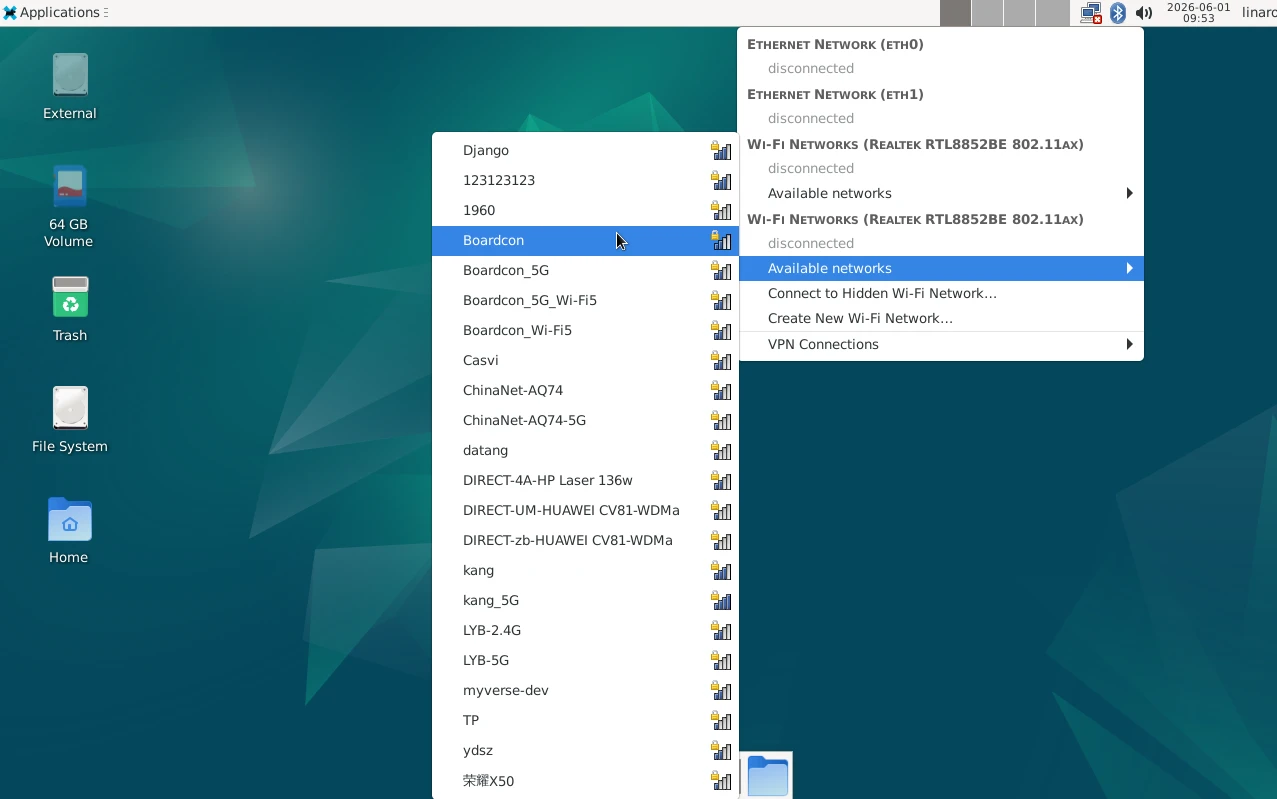
❷ Click the network icon in the top right corner of the UI interface.
❸ Click Available Networks, select the SSID from the list of available networks and enter the password.
When Wi-Fi is connected and the Wi-Fi icon is visible, users can verify network connectivity by browsing the web with the browser in the Debian desktop environment, or by running the test commands.
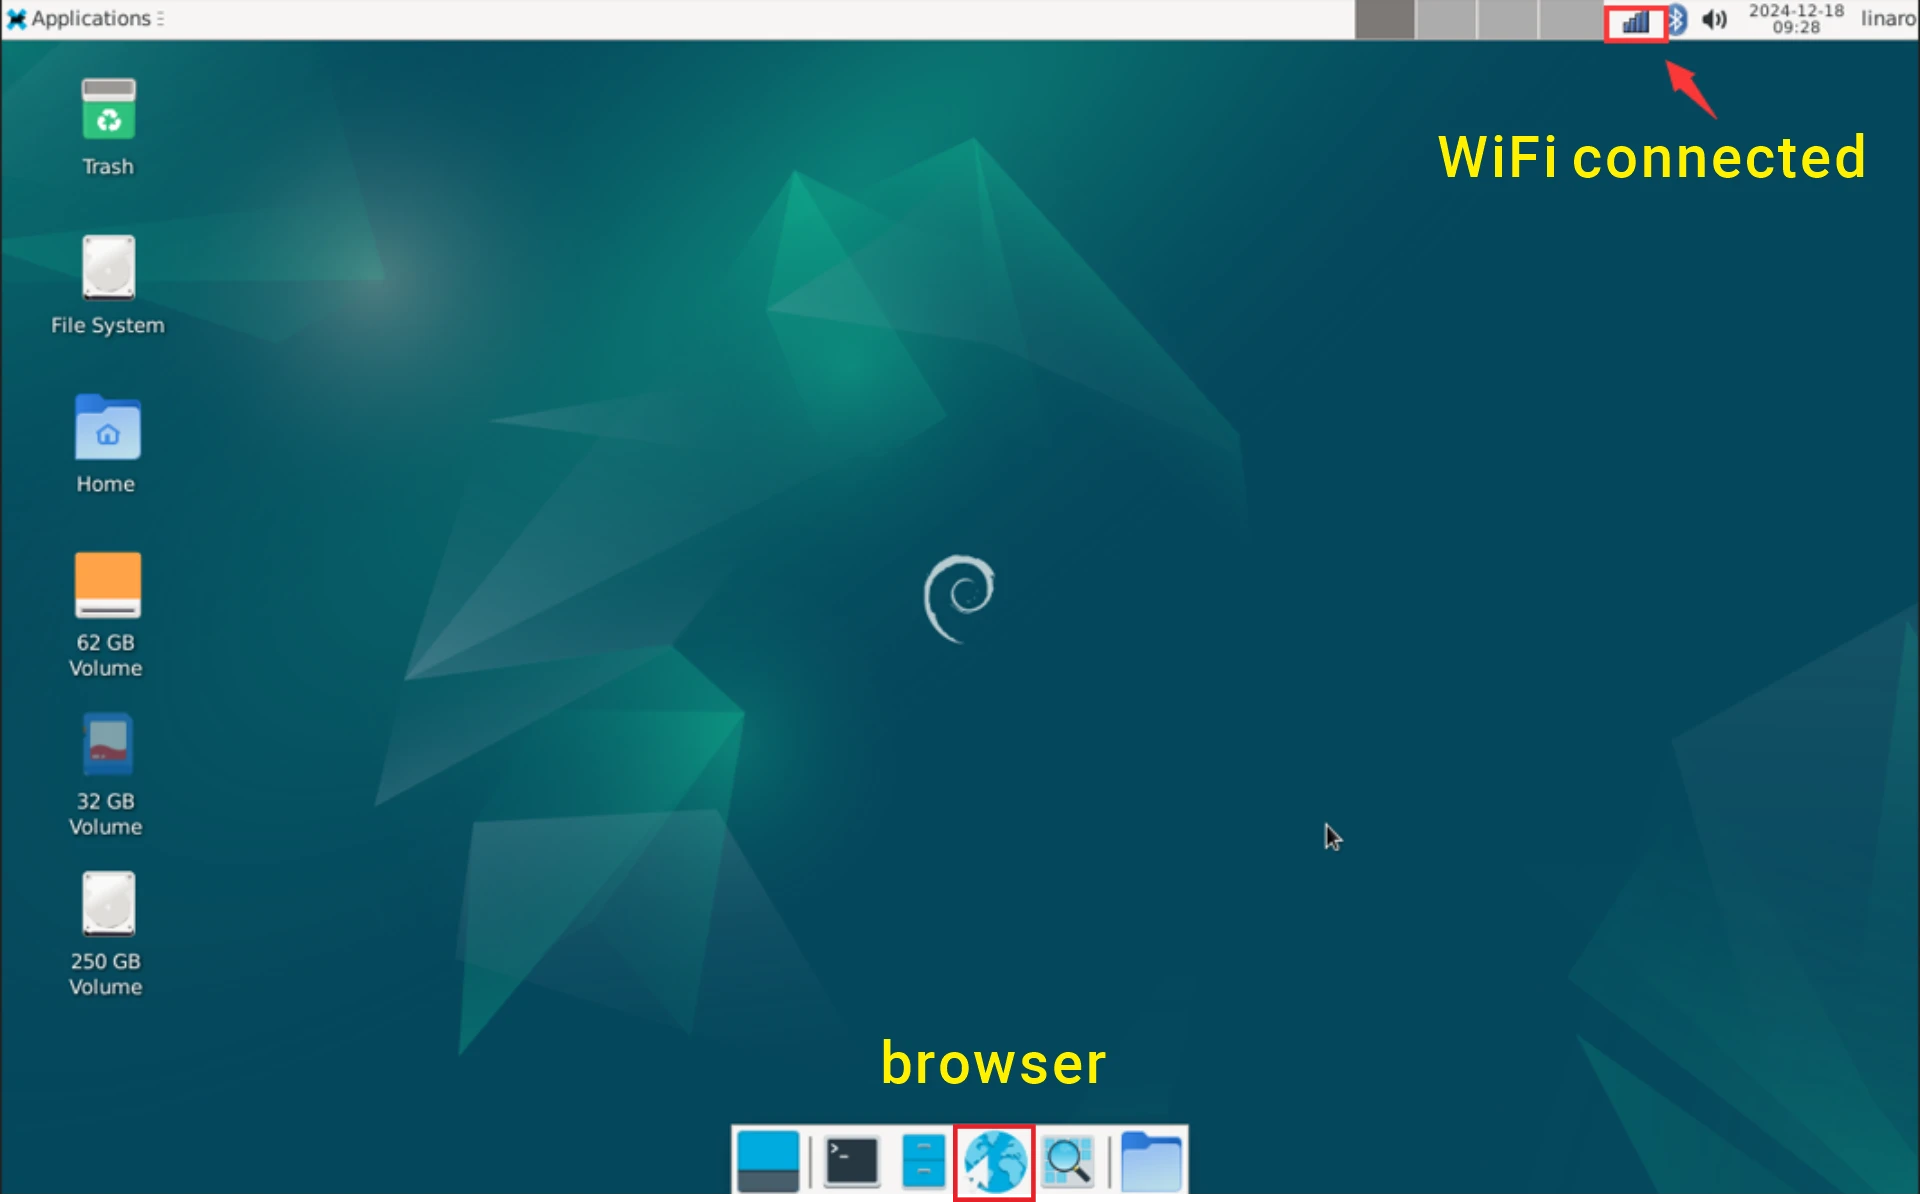
Browser
1ifconfig
2ping -I wlan0 www.armdesigner.com
4.9.2 Bluetooth
❶ Click the Bluetooth icon in the top right corner of the UI interface.
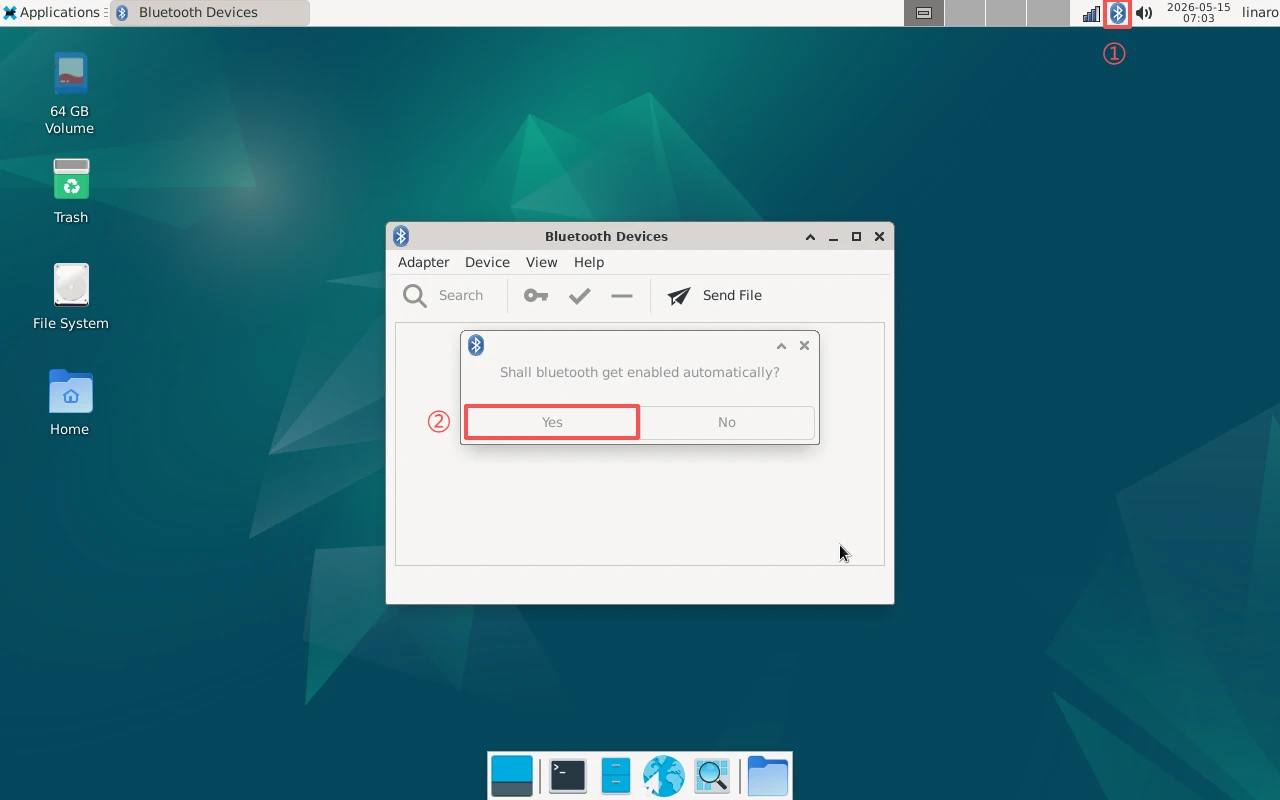
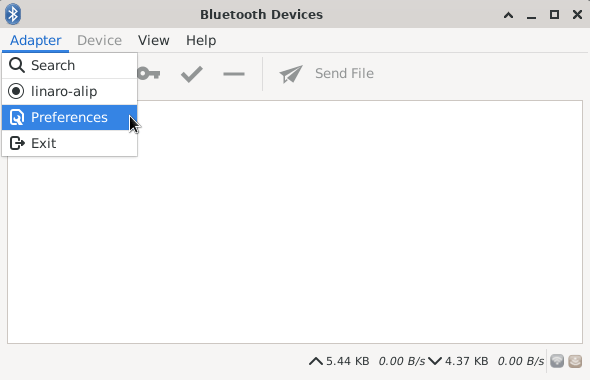
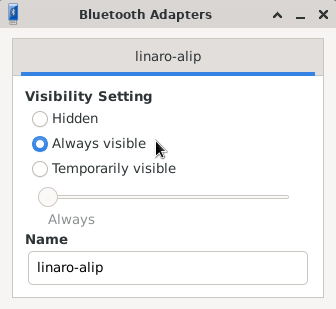
❷ The Bluetooth device name is hidden by default. Set the Bluetooth device name to be visible.
Click Adapter -> Preferences -> Always visible
❸ Click Search to start searching and select the available device in the list to pair.
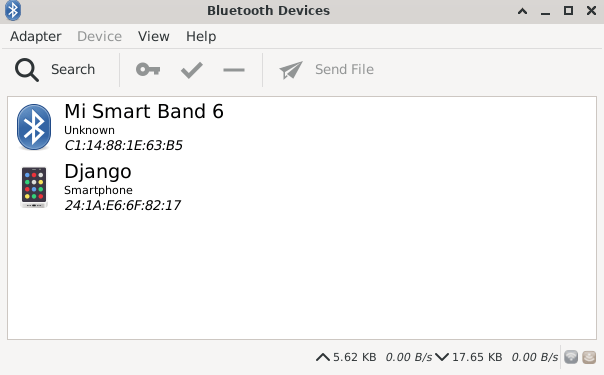
After pairing, devices can connect with each other automatically.
4.10 4G & GPS
4.10.1 4G
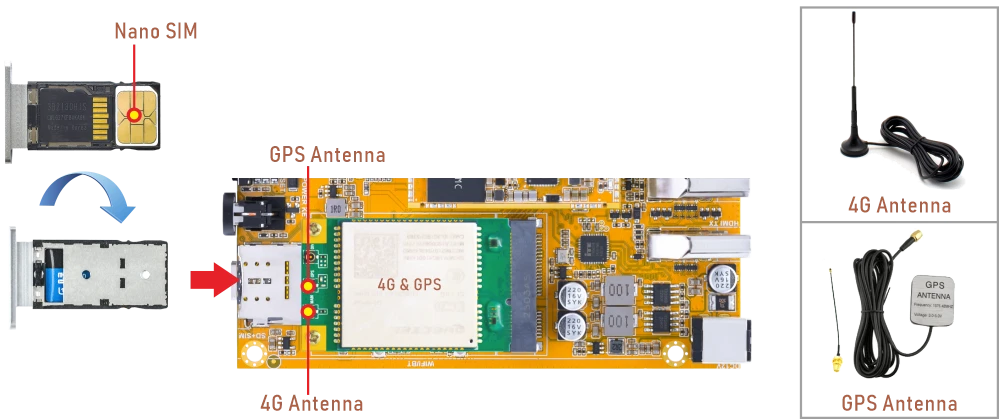
❶ Insert the 4G module into the mPCIe slot(4G model: EC20).
❷ Connect antenna and insert SIM card.
❸ Power on.
❹ Initiate the PPP connection.
1pppd call quectel-ppp &
❺ Test network connectivity.
1ifconfig ppp0
2ping -I ppp0 www.armdesigner.com
4.10.2 GPS
❶ Insert the 4G module into the mPCIe slot.
❷ Connect a GPS antenna.
❸ Power on.
❹ Enable the GPS function.
1echo -e "AT+QGPS=1\r\n" > /dev/ttyUSB2
❺ Read the GPS data.
1cat /dev/ttyUSB1
root@linaro-alip:/# echo -e "AT+QGPS=1\r\n" > /dev/ttyUSB2
root@linaro-alip:/# cat /dev/ttyUSB1
$GPVTG,,T,,M,,N,,K,N*2C

$GPGSA,A,1,,,,,,,,,,,,,,,,*32

$GPGGA,,,,,,0,,,,,,,,*66

$GPRMC,,V,,,,,,,,,,N,V*29

$GPVTG,,T,,M,,N,,K,N*2C

$GPGSA,A,1,,,,,,,,,,,,,,,,*32

$GPGGA,,,,,,0,,,,,,,,*66

$GPRMC,,V,,,,,,,,,,N,V*29
4.11 Audio
View sound card.
1cat /proc/asound/cards
root@linaro-alip:/# cat /proc/asound/cards
 0 [rockchipes8388 ]: rockchip-es8388 - rockchip-es8388
                      rockchip-es8388
 1 [rockchiphdmi0  ]: rockchip-hdmi0 - rockchip-hdmi0
                      rockchip-hdmi0
 2 [rockchiphdmi1  ]: rockchip-hdmi1 - rockchip-hdmi1
                      rockchip-hdmi1
 3 [rockchipdp0    ]: rockchip-dp0 - rockchip-dp0
                      rockchip-dp0
 4 [rockchipdp1    ]: rockchip-dp1 - rockchip-dp1
                      rockchip-dp1
0- Headset or speaker1- HDMI0 TX(HDMI0)2- HDMI1 TX(HDMI1)3- DP AIT mode(USB-C)4- DP to HDMI(HDMI2)
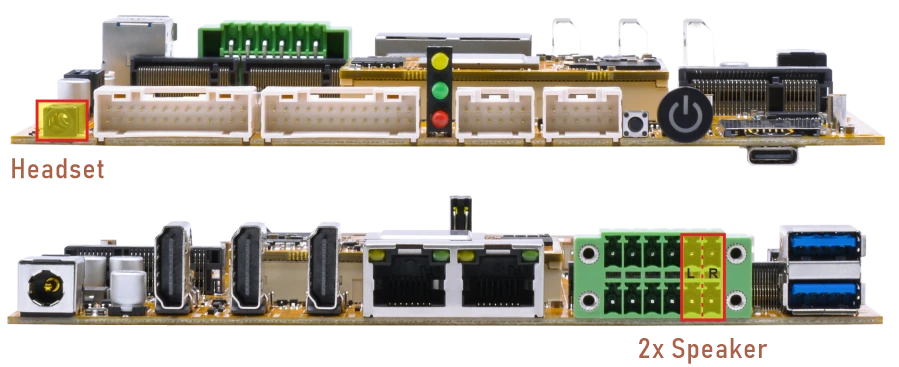
The headset jack supports both audio output and microphone input. For audio output, the headphone output has priority over the speaker output. When headphones are connected, the speaker output is disabled.
4.11.1 Audio in
❶ Plug the Headset into the 3.5mm Audio jack.
❷ Start recording.
1arecord -Dhw:0,0 -f cd record.wav
Press Ctrl + C to exit recording.
4.11.2 Audio out
Select Audio output device to play record.wav
1aplay -Dhw:0,0 record.wav
1aplay -Dhw:1,0 record.wav
1aplay -Dhw:2,0 record.wav
1aplay -Dhw:3,0 record.wav
1aplay -Dhw:4,0 record.wav
4.12 RTC
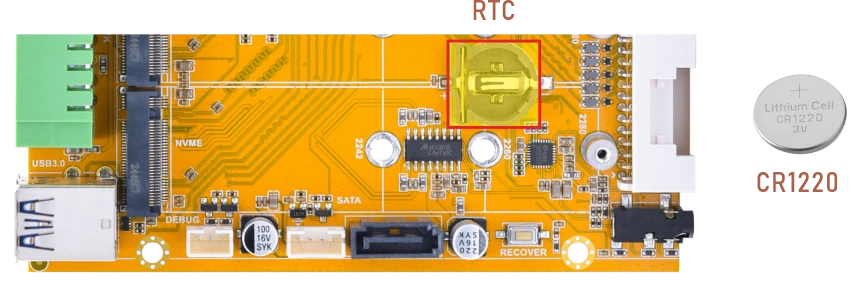
❶ Insert a CR1220 battery before test. It keeps the time running when the main power is off.
❷ Set date and time manually.
1date -s "2026-09-11 19:00:00"     //set system date
2hwclock -w                        //set the hardware clock to current system time
3hwclock                           //display date and time
root@linaro-alip:/# date -s "2026-09-11 19:00:00"
Fri Sep 11 07:00:00 PM UTC 2026
root@linaro-alip:/# hwclock -w
root@linaro-alip:/# hwclock
2026-09-11 19:00:02.944664+00:00
root@linaro-alip:/# hwclock
2026-09-11 19:00:10.666488+00:00
❸ Power off the board. Wait a while, then reapply power. If the RTC is functioning correctly, the clock should maintain its time and keep running while the board is powered off.
1hwclock
root@linaro-alip:/# hwclock
2026-09-11 19:01:17.479482+00:00
root@linaro-alip:/# hwclock
2026-09-11 19:01:21.293676+00:00
root@linaro-alip:/# hwclock
2026-09-11 19:01:23.555443+00:00
4.13 RS485
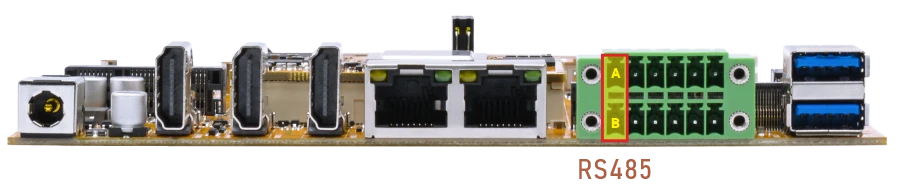
❶ Connect PC and board with USB-to-RS485 adapter.
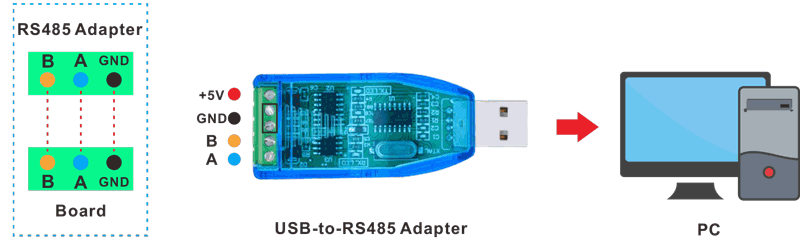
RS485 connection
❷ Open the Serial Terminal and set baud rate for RS485 adapter and development board respectively.
Baud rate: development board - 1500000; RS485 adapter - 115200
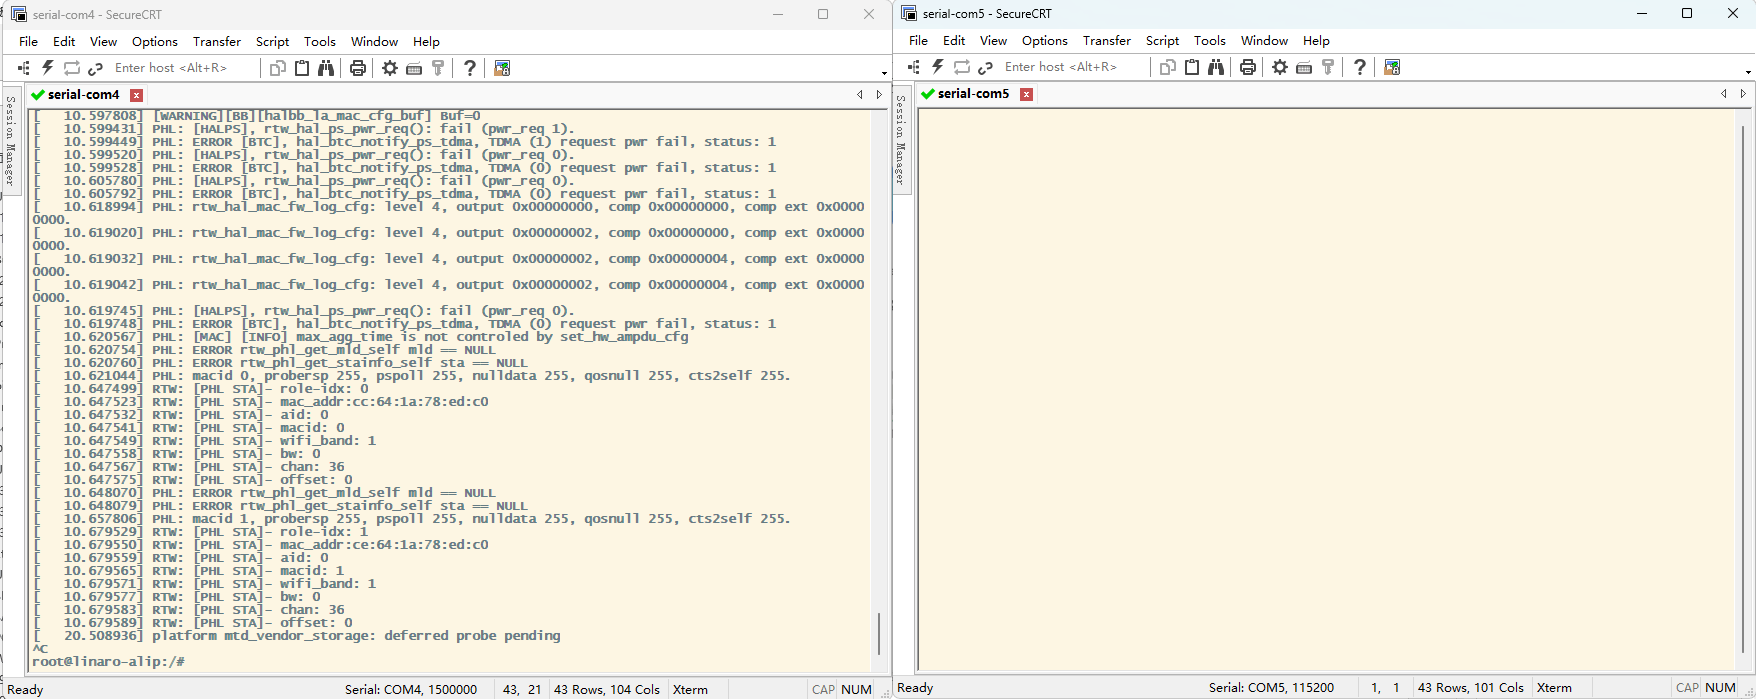
❸ Execute command in the terminal of the board.
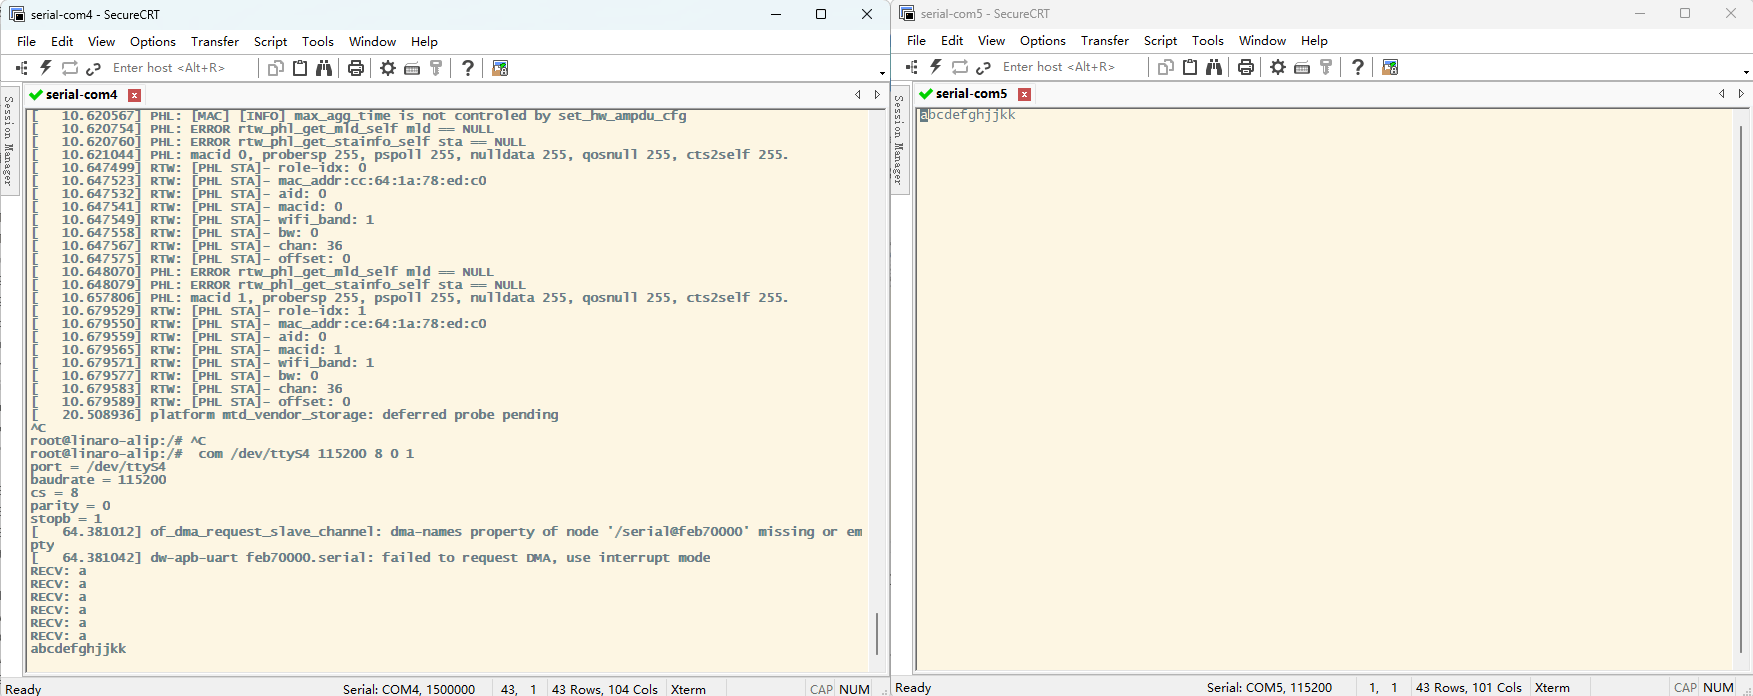
1com /dev/ttyS4 115200 8 0 1
❹ Input character to test RS485 communication.
4.14 CAN
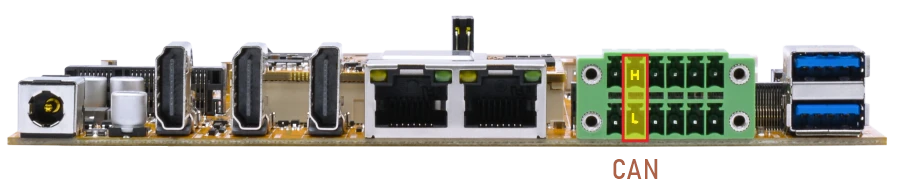
❶ Connect PC and board with USB-to-CAN adapter.
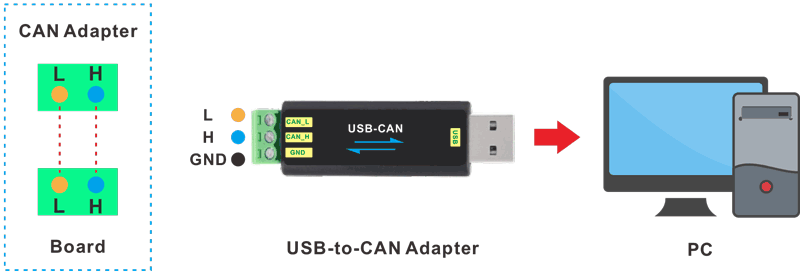
CAN connection
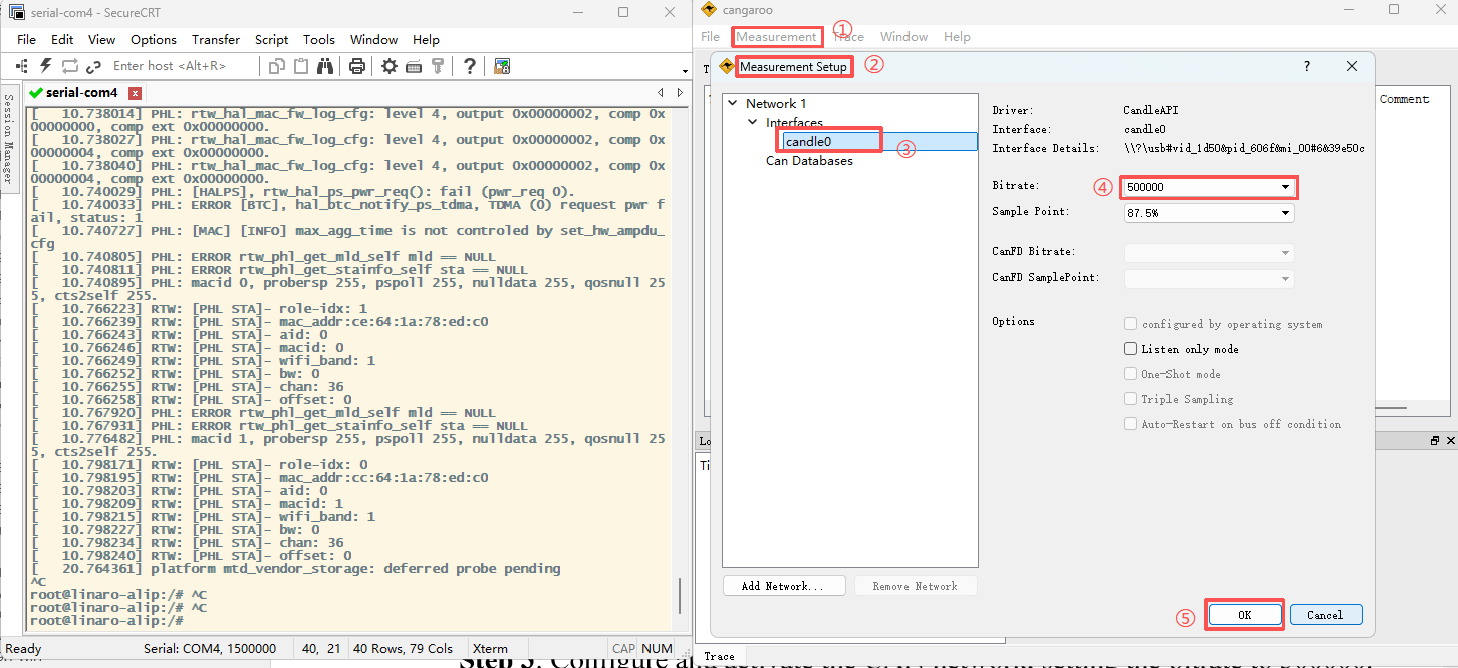
❷ Open the CAN application and set the baudrate to 500000 on PC.
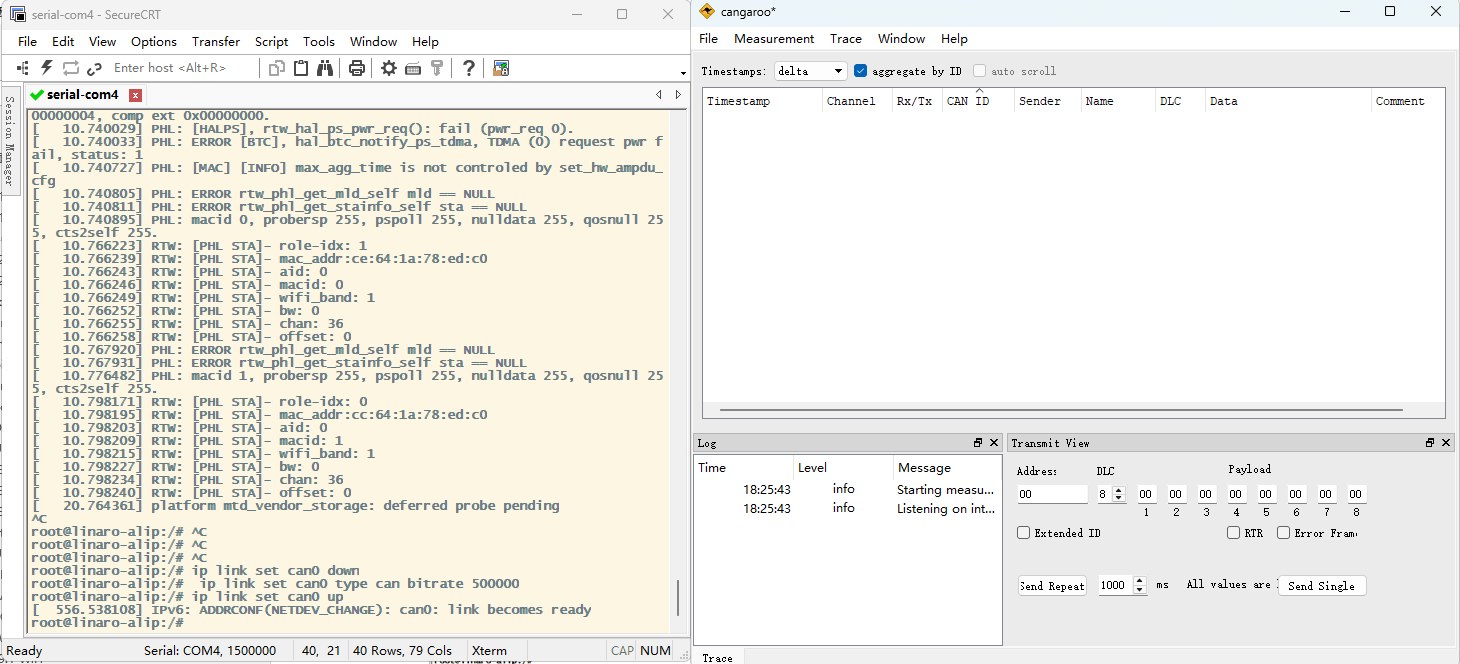
❸ Execute commands on Serial Terminal to configure CAN.
1ip link set can0 down
2ip link set can0 type can bitrate 500000
3ip link set can0 up
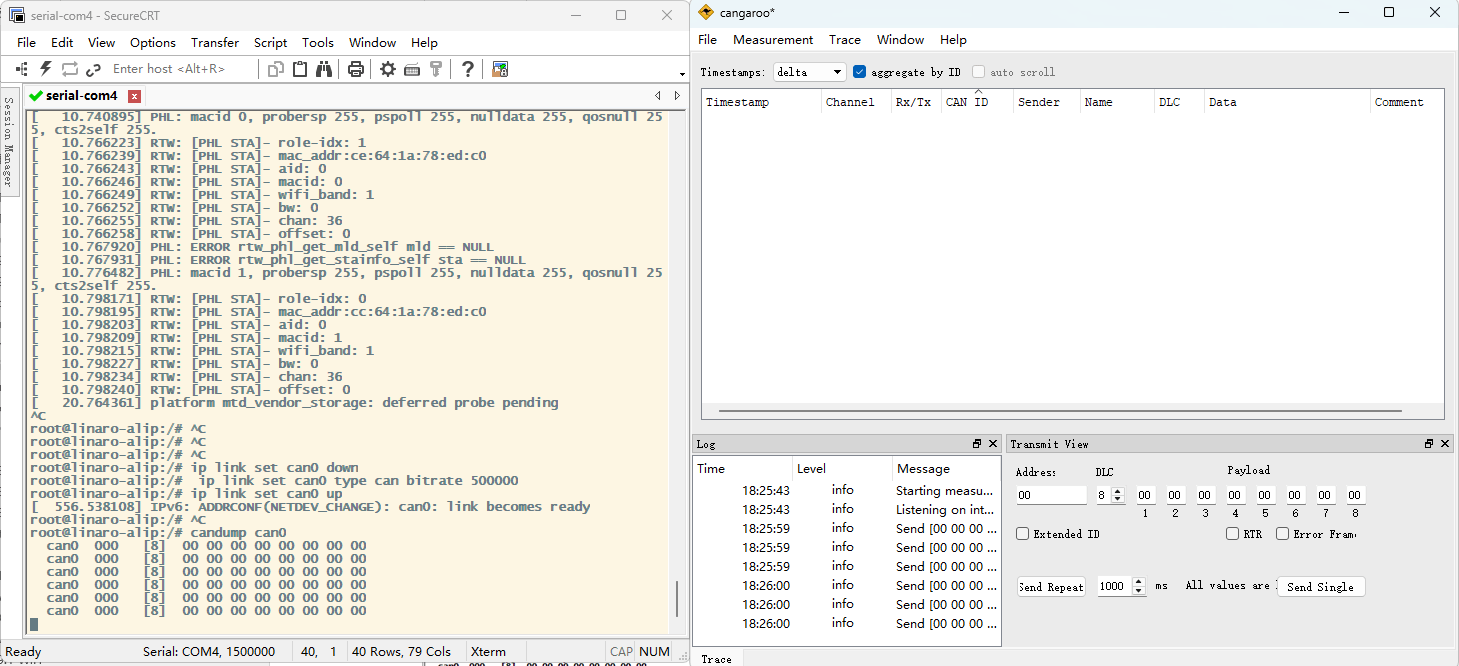
❹ Configure CAN as receiver.
1candump can0
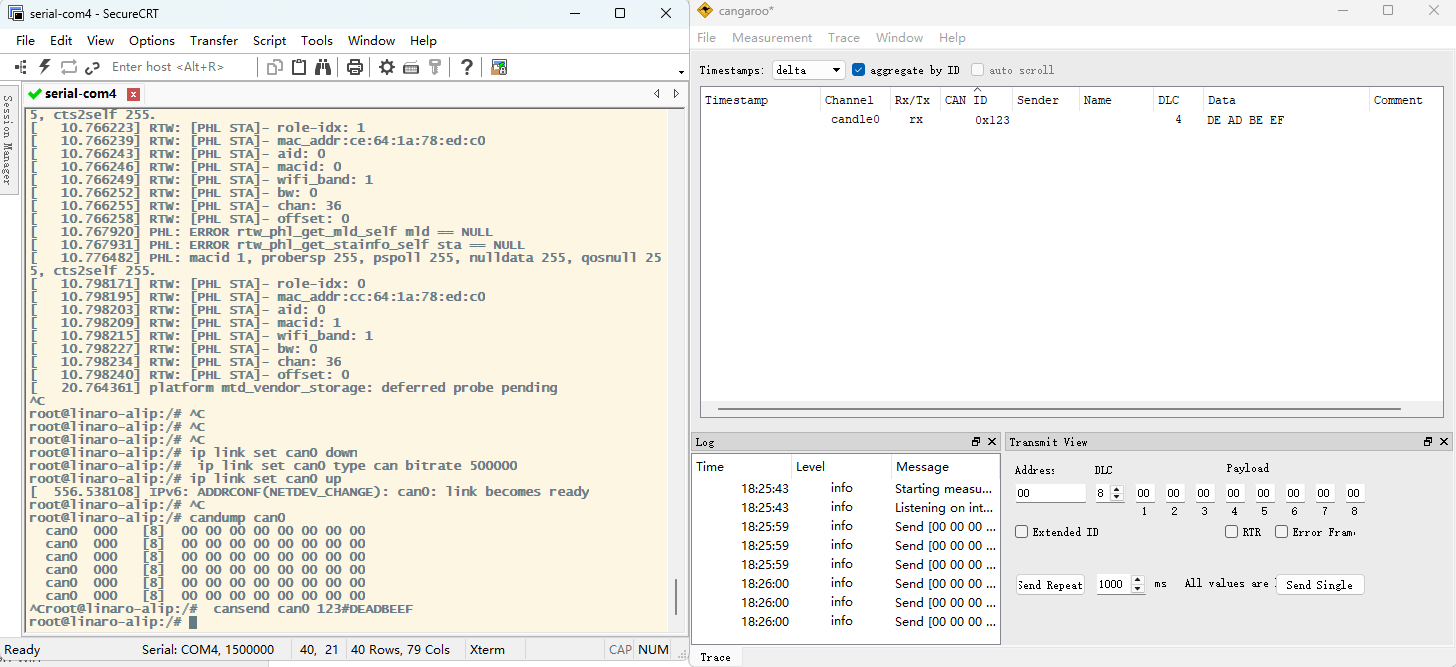
❺ Configure CAN as Transmitter.
1cansend can0 123#DEADBEEF
4.15 UART(RS232)
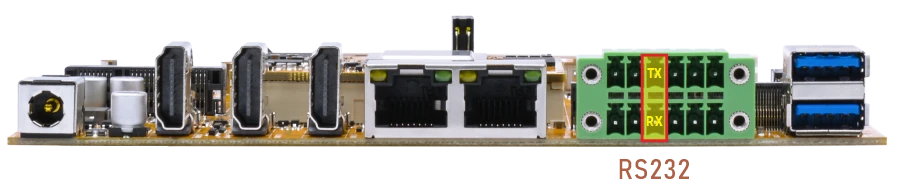
The UART loopback test is for reference only.
❶ Connect RX and TX of UART(RS232).
❷ Execute command and input character to test.
1com /dev/ttyS7 115200 8 0 1
root@linaro-alip:/# com /dev/ttyS7 115200 8 0 1
port = /dev/ttyS7
baudrate = 115200
cs = 8
parity = 0
stopb = 1
ioioioioioioio
RECV: ioioioioioioio
2323232uiui
RECV: 2323232uiui
uuut
RECV: uuut
888
RECV: 888
4.16 Camera
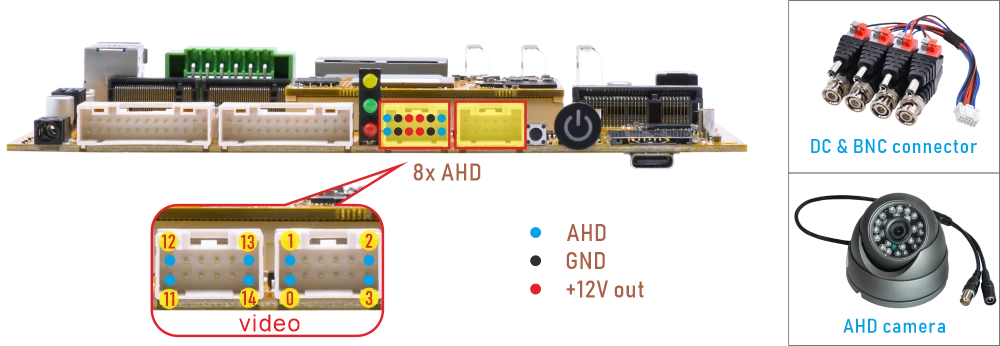
❶ Connect AHD camera to the development board.
❷ Preview.
1/rockchip-test/camera/camera-ahd_1280x800.sh //MIPI display output
1/rockchip-test/camera/camera-ahd_3640x2160.sh //HDMI display output
To preview any specific camera, just modify the device ID. Take video11 as an example:
1gst-launch-1.0 v4l2src device=/dev/video11 ! video/x-raw, format=NV12, width=1920, height=1080, framerate=25/1 ! xvimagesink
4.17 Video Playback
4.17.1 Built-in Playback
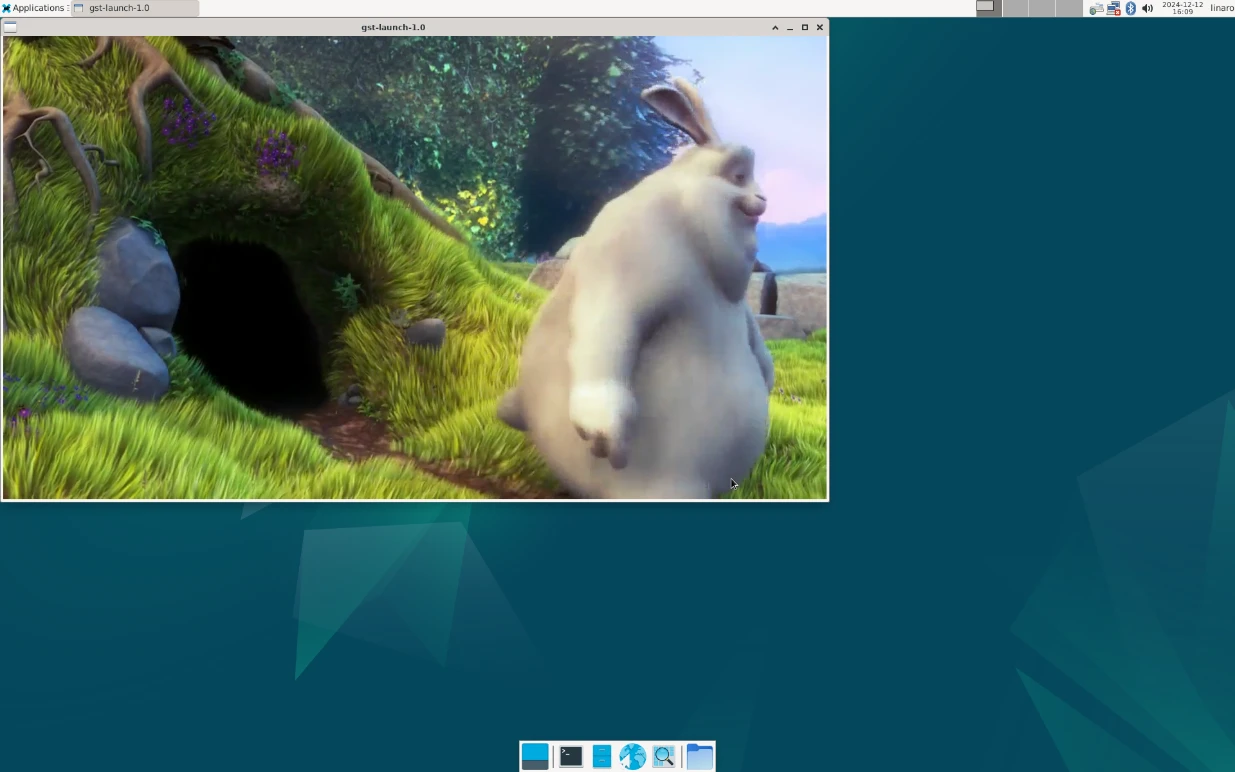
The script instruction directory is in /rockchip-test/video/, just run it.
root@linaro-alip:/# ls /rockchip-test/video/
test_dec-gst.sh     test_enc-gst.sh         test_gst_video_maxfps.sh
test_dec-mpv.sh     test_gst_multivideo.sh  video_stresstest.sh
test_dec-parole.sh  test_gst_video.sh       video_test.sh
test_dec-qt.sh      test_gst_video_fps.sh
root@linaro-alip:/rockchip-test/video# ./test_gst_video.sh
Setting pipeline to PAUSED ...
Pipeline is PREROLLING ...
Redistribute latency...
mpp[4383]: mpp_info: mpp version: 48962a10 author: Hongjin Li    2024-09-19 fix[avsd]: Fix attach dev error issue
mpp[4383]: mpp_info: mpp version: 48962a10 author: Hongjin Li    2024-09-19 fix[avsd]: Fix attach dev error issue
mpp[4383]: mpp_info: mpp version: 48962a10 author: Hongjin Li    2024-09-19 fix[avsd]: Fix attach dev error issue
mpp[4383]: mpp_info: mpp version: 48962a10 author: Hongjin Li    2024-09-19 fix[avsd]: Fix attach dev error issue
mpp[4383]: mpp_info: mpp version: 48962a10 author: Hongjin Li    2024-09-19 fix[avsd]: Fix attach dev error issue
Redistribute latency...
mpp[4383]: h264d_api: is_avcC=1
Pipeline is PREROLLED ...
Prerolled, waiting for async message to finish...
Setting pipeline to PLAYING ...
Redistribute latency...
New clock: GstSystemClock
0:00:06.6 / 0:00:29.5 (22.7 %)
4.17.2 Browser Playback
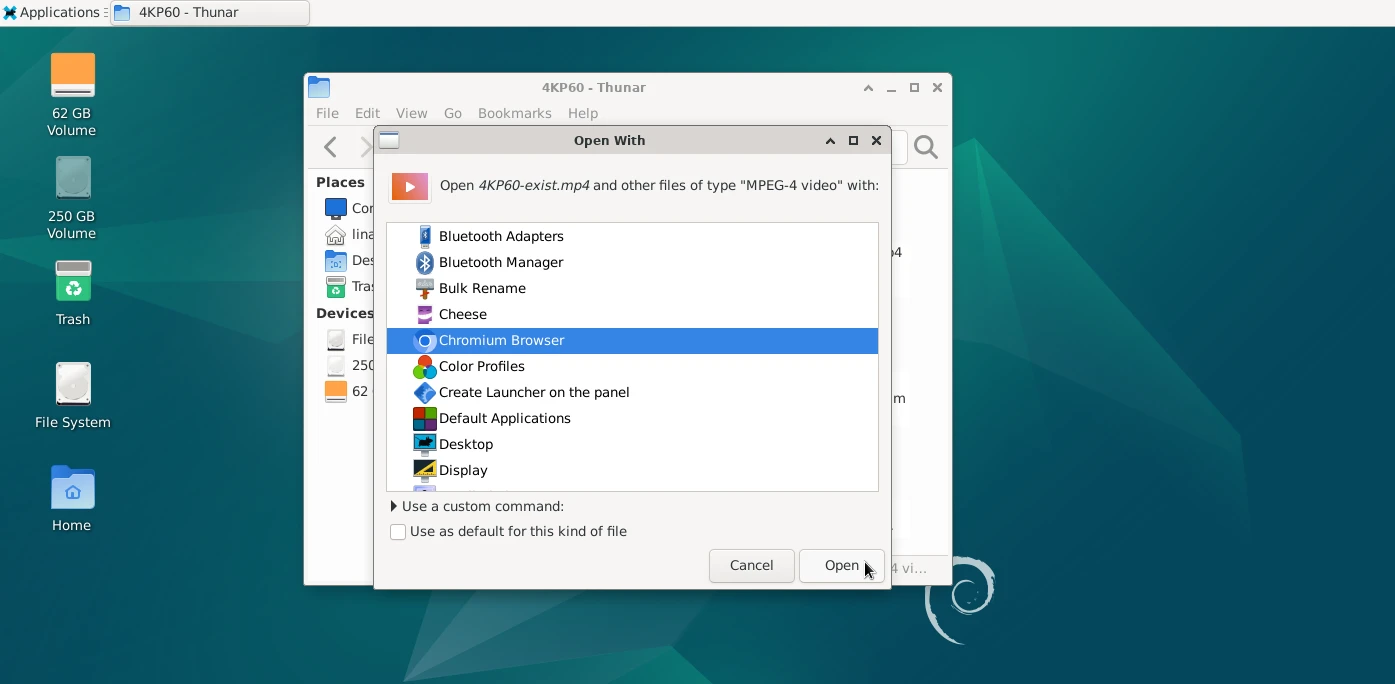
❶ Right-click Video file, select Open With Other Application…
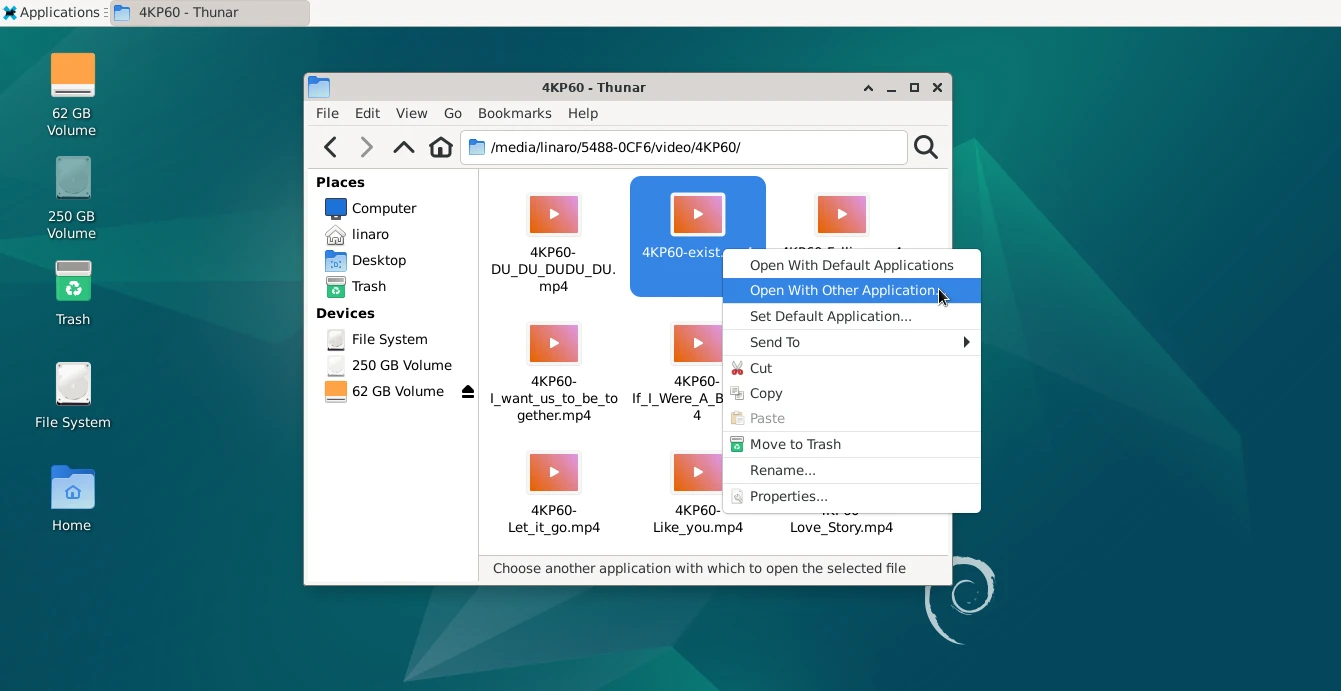
❷ Select Chromium Browser in the list, click open
Note
Google Chrome supports up to 4K@60Hz playback for VP8, H.264, H.265, VP9, and AV1; however, for H.265, only certain files can be played.
4.17.3 Command Line
1gst-play-1.0 --videosink=xvimagesink /media/linaro/5488-0CF6/video/8KP30/H265_8KP30-2.mp4 --audiosink="alsasink device=hw:1,0"
Command explanation:
/media/linaro/5488-0CF6/video/8KP30/H265_8KP30-2.mp4The media file path to be played.--audiosink="alsasink device=hw:1,0"Specifies the Audio output device.