5. Buildroot Application
5.1 Serial Terminal
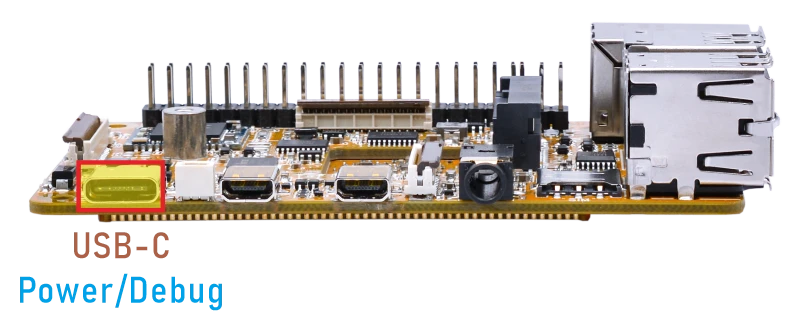
Connect the board to the PC via a USB-C cable, and open a serial terminal with the baud rate set to 1500000. The boot log will appear on the terminal.
5.2 Display
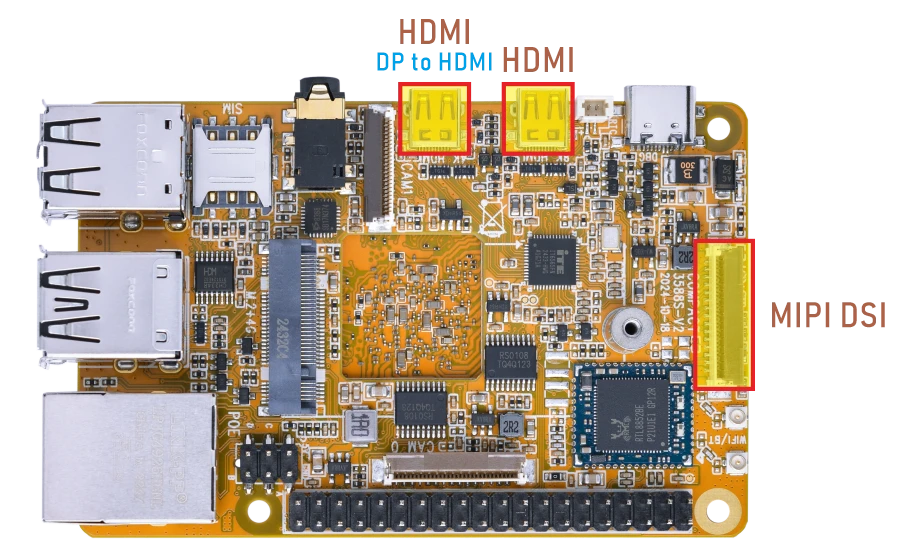
Display Ports
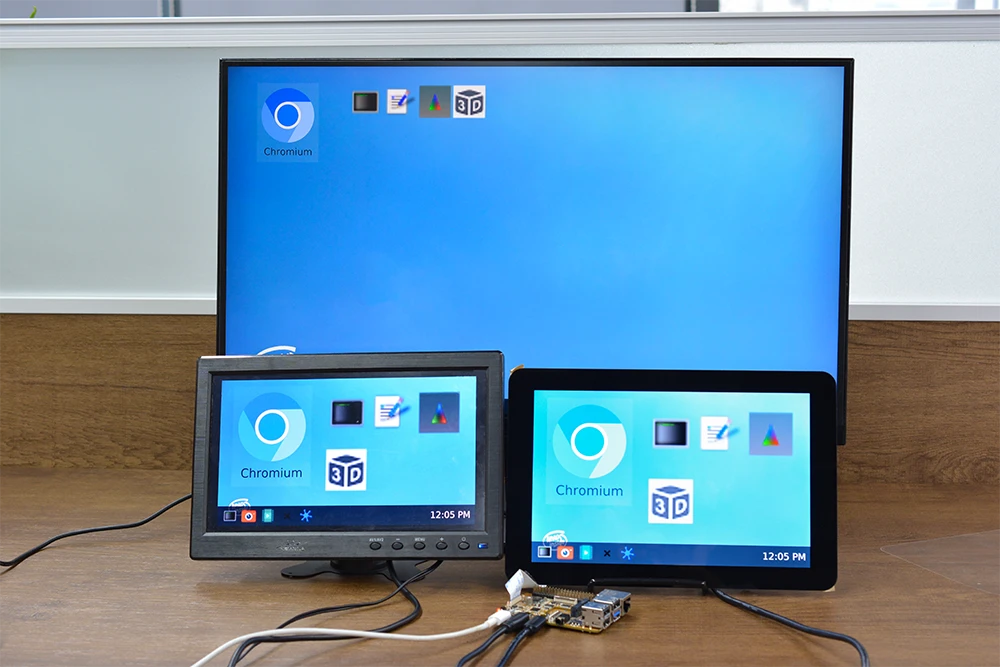
Compact3588S supports MIPI LCD, HDMI and DP-to-HDMI triple-display.
Warning
MIPI LCD hot swapping is not allowed.
5.3 USB
5.3.1 USB3.0
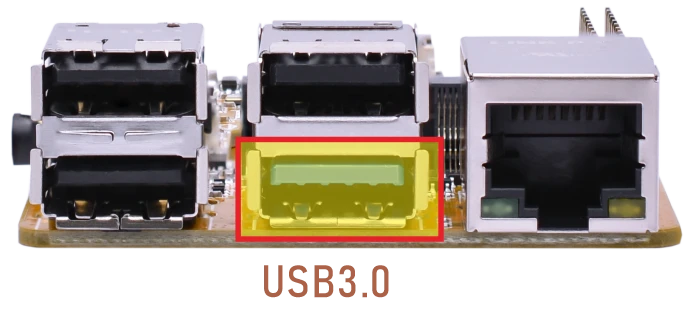
The Compact3588S USB3.0 supports both Host and Device roles. ADB requires the USB3.0 port to be in Device mode.
ADB
❶ Connect the board and PC host with USB-A cable.
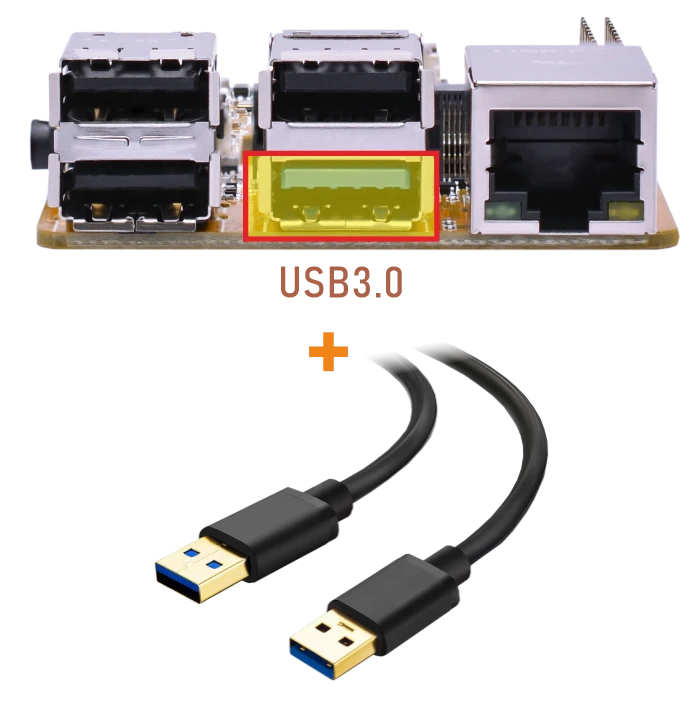
❷ Install ADB driver on Windows system.
❸ Press Windows + R to open the Run program. Type cmd and press Enter
❹ Execute the follow commands to enable ADB.
1adb shell

enable ADB
USB3.0 Host
❶ Switch the USB Host mode on the serial port CLI.
1echo host > /sys/kernel/debug/usb/fc000000.usb/mode
❷ Insert the USB flash drive.
❸ View the device auto-mount directory.
1df -h
Serial terminal outputroot@rk3588s-buildroot:/# df -h Filesystem Size Used Avail Use% Mounted on /dev/root 14G 696M 13G 6% / devtmpfs 3.9G 8.0K 3.9G 1% /dev tmpfs 3.9G 140K 3.9G 1% /tmp tmpfs 3.9G 496K 3.9G 1% /run tmpfs 3.9G 208K 3.9G 1% /var/log tmpfs 3.9G 0 3.9G 0% /dev/shm /dev/mmcblk0p7 123M 12M 108M 10% /oem /dev/mmcblk0p8 15G 332K 15G 1% /userdata /dev/sda1 118G 8.2G 110G 7% /mnt/udisk
The current USB connection speed can be checked from the kernel log. When the device operates in USB3.0 mode, the log usually shows SuperSpeed.
5.3.2 USB2.0
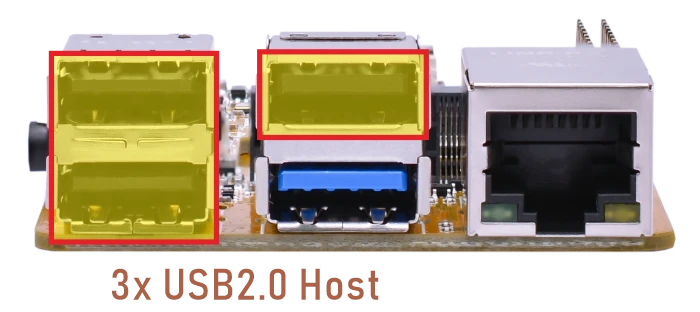
The USB2.0 Host can connect peripherals such as mouse, keyboards, and flash drives.
5.4 Ethernet
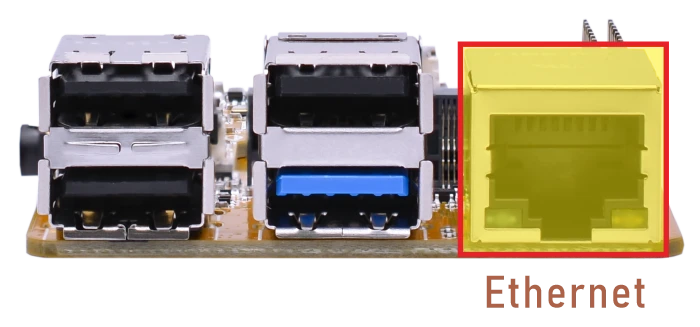
❶ Connect the Board and router with an Ethernet cable.
❷ View the status of the network interface.
1ifconfig
❸ Ping URL to test Network.
1ping -I eth0 www.armdesigner.com
root@rk3588s-buildroot:/# ifconfig
eth0      Link encap:Ethernet  HWaddr 3A:3B:7B:E4:37:FA
          inet addr:192.168.0.133  Bcast:192.168.0.255  Mask:255.255.255.0
          inet6 addr: fe80::a3f:1281:d504:ef04/64 Scope:Link
          UP BROADCAST RUNNING MULTICAST  MTU:1500  Metric:1
          RX packets:341 errors:0 dropped:29 overruns:0 frame:0
          TX packets:31 errors:0 dropped:0 overruns:0 carrier:0
          collisions:0 txqueuelen:1000
          RX bytes:57389 (56.0 KiB)  TX bytes:3126 (3.0 KiB)
          Interrupt:69
root@rk3588s-buildroot:/# ping -I eth0 www.armdesigner.com
PING www.armdesigner.com (67.222.54.196) from 192.168.0.133 eth0: 56(84) bytes of data.
64 bytes from 67-222-54-196.unifiedlayer.com (67.222.54.196): icmp_seq=1 ttl=48 time=180 ms
64 bytes from 67-222-54-196.unifiedlayer.com (67.222.54.196): icmp_seq=2 ttl=48 time=179 ms
64 bytes from 67-222-54-196.unifiedlayer.com (67.222.54.196): icmp_seq=3 ttl=48 time=180 ms
64 bytes from 67-222-54-196.unifiedlayer.com (67.222.54.196): icmp_seq=4 ttl=48 time=180 ms
64 bytes from 67-222-54-196.unifiedlayer.com (67.222.54.196): icmp_seq=5 ttl=48 time=179 ms
5.5 WiFi & Bluetooth
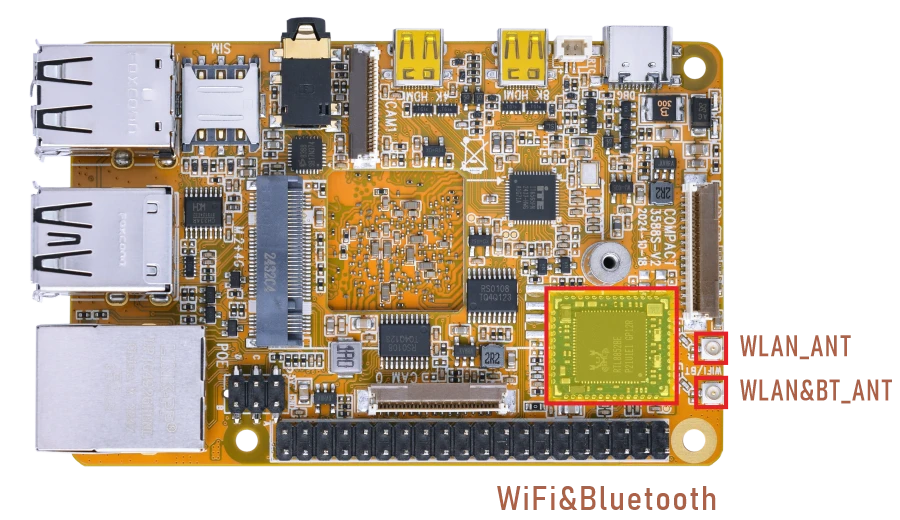
5.5.1 WiFi
❶ Connect the antennas.
❷ Check whether the wifi device wlan0 exists.
1ifconfig
❸ Search for available WiFi hotspots.
1iwlist wlan0 scan
❹ Connect hotspot.
1wifi-connect.sh SSID PSK //'SSID': user SSID, 'PSK': password
After connected, ping URL/IP at terminal to test network.
1ifconfig
2ping -I wlan0 www.armdesigner.com
5.6.2 Bluetooth
1hciconfig -a            //view device status
2hciconfig hci0 piscan   //allow Bluetooth to be searched
3bluetoothctl            //allow Bluetooth to be pairable
4scan on                 //search for Bluetooth devices
After scanning for devices, turn off the scan, otherwise, the device will continue to search and refresh.
1scan off
Connect the device(eg. 2C:A0:42:D1:14:D5). During the Bluetooth connection process, some permissions may be requested. Generally, just enter yes
1connect 2C:A0:42:D1:14:D5
[bluetooth]# connect 2C:A0:42:D1:14:D5
Attempting to connect to 2C:A0:42:D1:14:D5
hci0 2C:A0:42:D1:14:D5 type BR/EDR connected eir_len 11
[CHG] Device 2C:A0:42:D1:14:D5 Connected: yes
[NEW] Endpoint /org/bluez/hci0/dev_A8_35_12_9A_EB_4D/sep1
[NEW] Endpoint /org/bluez/hci0/dev_A8_35_12_9A_EB_4D/sep2
[NEW] Endpoint /org/bluez/hci0/dev_A8_35_12_9A_EB_4D/sep3
[NEW] Endpoint /org/bluez/hci0/dev_A8_35_12_9A_EB_4D/sep4
[NEW] Transport /org/bluez/hci0/dev_A8_35_12_9A_EB_4D/sep1/fd0
Connection successful
[KangKang]# [ 3762.663001] input: KangKang (AVRCP) as /devices/virtual/input/input9
[NEW] Player /org/bluez/hci0/dev_A8_35_12_9A_EB_4D/player0 [default]
[KangKang]# [09:54:12.292] event9  - KangKang (AVRCP): is tagged by udev as: Keyboard
[09:54:12.292] event9  - KangKang (AVRCP): device is a keyboard
[09:54:12.292] libinput: configuring device "KangKang (AVRCP)".
[09:54:12.292] associating input device event9 with output DSI-1 (none by udev)
[KangKang]#
5.6 UART
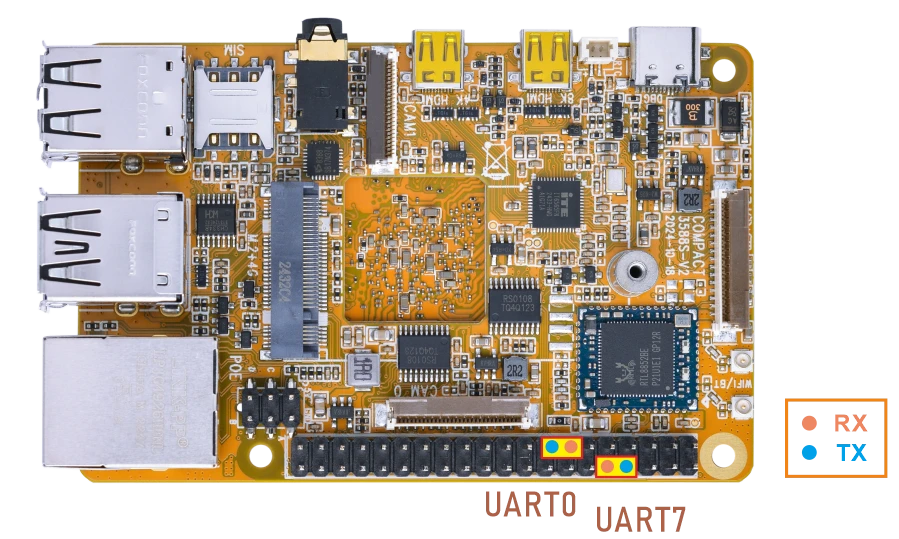
❶ Connect RX and TX of UART.
❷ Execute command and input character to test.
1com /dev/ttyS0 115200 8 0 1 //UART0
root@rk3588s-buildroot:/# com /dev/ttyS0 115200 8 0 1
port = /dev/ttyS0
baudrate = 115200
cs = 8
parity = 0
stopb = 1
123456abcd
RECV: 123456abcd
The tests for UART7 are similar to those for UART0. Simply replace ttyS0 with ttyS7.
5.7 4G
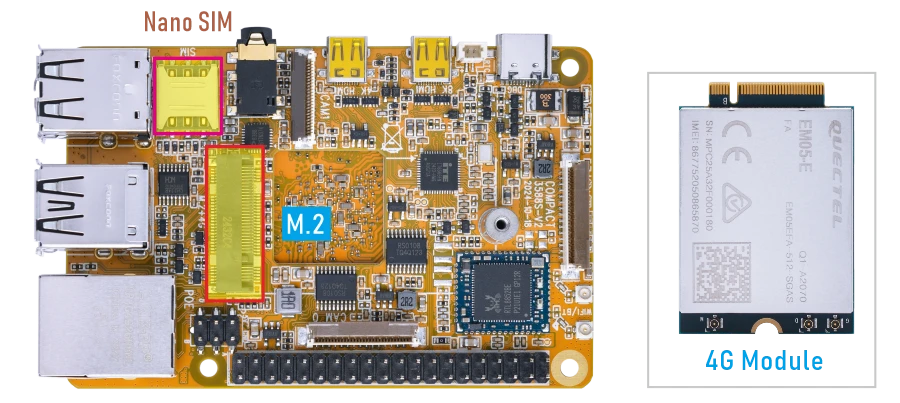
❶ Insert 4G module to M.2 slot (4G model: EM05).
❷ Connect antenna and insert SIM card.
❸ Power on.
❹ Connect to 4G network.
1mkdir -p /var/run/pppd/lock
2pppd call quectel-ppp &
❺ Test network.
1ifconfig
2ping -I ppp0 www.armdesigner.com
5.8 Audio I/O
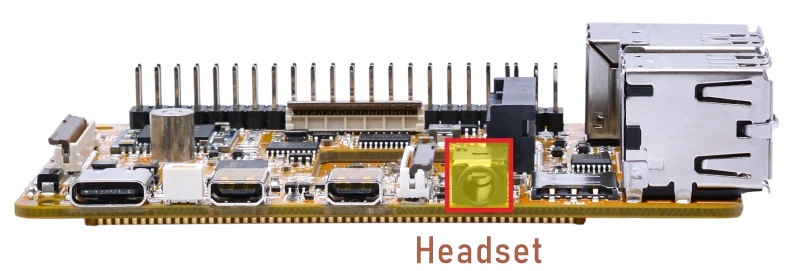
❶ Plug the Headset into the Audio jack.
❷ View sound card.
1cat /proc/asound/cards
root@rk3588s-buildroot:/# cat /proc/asound/cards
0 [rockchipes8388 ]: rockchip-es8388 - rockchip-es8388
                     rockchip-es8388
1 [rockchipdp0    ]: rockchip_dp0 - rockchip-dp0
                     rockchip-dp0
2 [rockchiphdmi0  ]: rockchip-hdmi0 - rockchip-hdmi0
                     rockchip-hdmi0
❸ Record
1arecord -Dhw:0,0 -f cd record.wav
❹ Playback
1aplay -Dhw:0,0 record.wav //Audio output via headset
aplay -Dhw:0,0 record.wav   //output via Headset
aplay -Dhw:1,0 record.wav   //output via DP-to-HDMI
aplay -Dhw:2,0 record.wav   //output via HDMI
5.9 SD Card
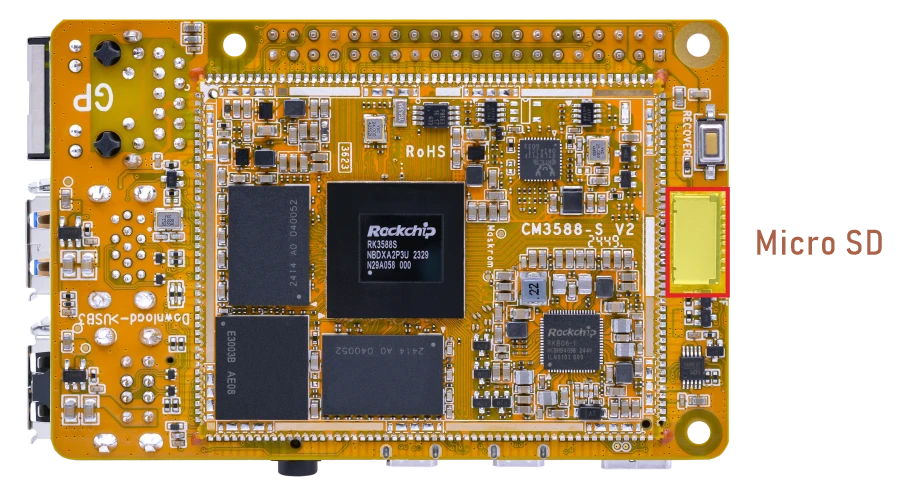
Insert the SD card into the development board, and it will be automatically mounted.
1df -h //View the device mount path
root@rk3588s-buildroot:/# df -h
Filesystem      Size  Used Avail Use% Mounted on
/dev/root        14G  701M   13G   6% /
devtmpfs        3.9G  8.0K  3.9G   1% /dev
tmpfs           3.9G  140K  3.9G   1% /tmp
tmpfs           3.9G  568K  3.9G   1% /run
tmpfs           3.9G  216K  3.9G   1% /var/log
tmpfs           3.9G     0  3.9G   0% /dev/shm
/dev/mmcblk0p8   15G  464K   15G   1% /userdata
/dev/mmcblk0p7  123M   12M  108M  10% /oem
/dev/mmcblk1p1   30G  3.1G   27G  11% /mnt/sdcard
/dev/sda1        58G   47G   12G  81% /mnt/udisk
5.10 RTC
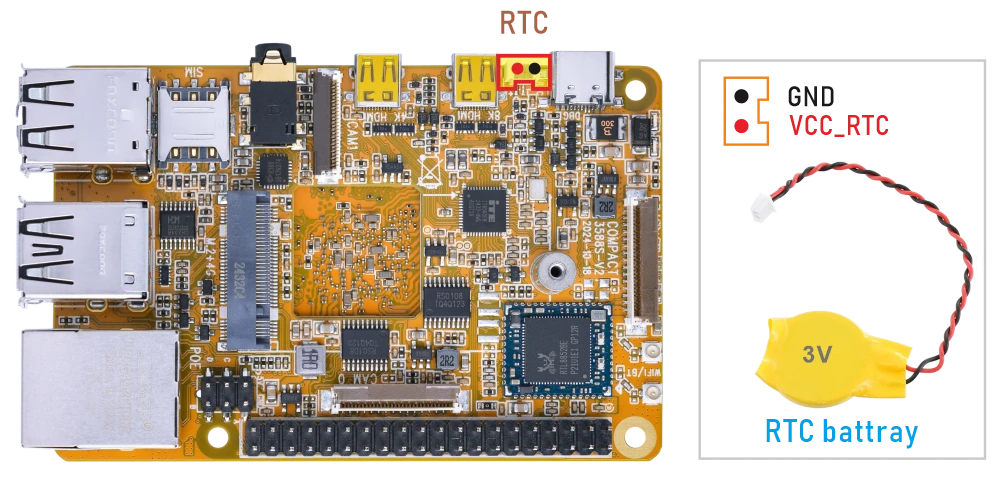
❶ Insert a 3V battery before test. It keeps the time running when the main power is off.
❷ Set date and time manually.
1date -s "2024-10-18 16:25:30"           //set system date
2hwclock -w                              //set the hardware clock to current system time
3hwclock
root@rk3588s-buildroot:/# date -s "2024-10-18 16:25:30"
Fri Oct 18 16:25:30 UTC 2024
root@rk3588s-buildroot:/# hwclock -w
root@rk3588s-buildroot:/# hwclock
Fri Oct 18 16:25:36 2024  0.000000 seconds
root@rk3588s-buildroot:/#
❸ Power off the board and disconnect the main power supply. Wait for a period of time, then power on the board again. If the RTC is working properly, the hardware clock time should be retained and continue running after power-off.
1hwclock
root@rk3588s-buildroot:/# hwclock
Fri Oct 18 16:27:14 2024  0.000000 seconds
root@rk3588s-buildroot:/#
5.11 Camera
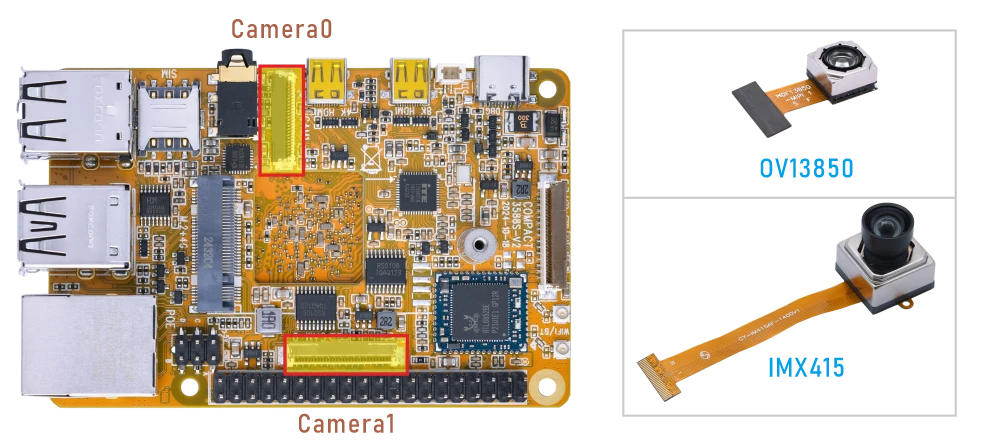
Compact3588s camera0 and camera1 share the signal I2C3, Boardcon Debian firmware default camera0 and camera1 are enabled.
❶ Connect the OV13850 to camera0, and IMX415 to camera1 before power on .
❷ Power on.
❸ Preview.
1cd /rockchip-test/camera/
2./camera0_rkisp_test.sh        //camera0
3./camera1_rkisp_test.sh        //camera1
5.12 SPI
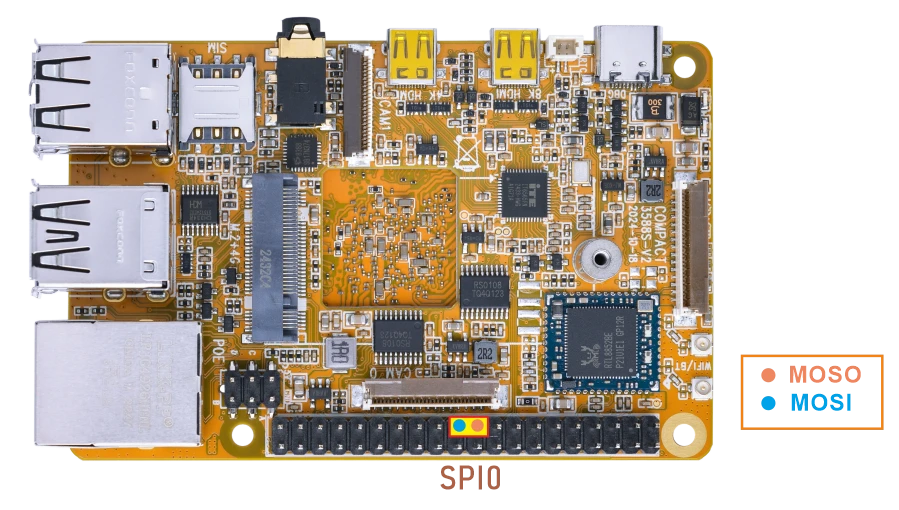
❶ Connect MOSI and MISO of SPI.
❷ SPI loopback test.
1spidev_test
root@rk3588s-buildroot:/# spidev_test
spi mode: 0
bits per word: 8
max speed: 10000000 Hz (10000 KHz)

FF FF FF FF FF FF
40 00 00 00 00 95
FF FF FF FF FF FF
FF FF FF FF FF FF
FF FF FF FF FF FF
DE AD BE EF BA AD
F0 0D
5.13 GPIO
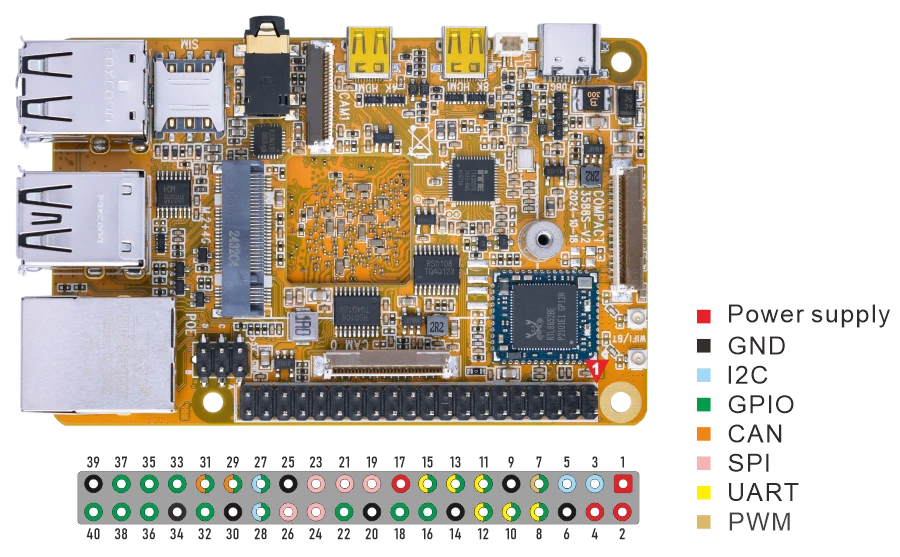
pin |
GPIO |
Device number |
pin |
GPIO |
Device number |
|---|---|---|---|---|---|
3 |
I2C3_SDA_M0_3V3 |
48 |
12 |
GPIO4_B5_d |
141 |
5 |
I2C3_SCL_M0_3V3 |
49 |
16 |
GPIO1_A2_d |
34 |
7 |
GPIO3_D5_d |
125 |
18 |
GPIO1_A3_d |
35 |
11 |
GPIO4_A6_d |
134 |
22 |
GPIO1_D0_d |
56 |
15 |
GPIO4_A3_d |
131 |
28 |
GPIO3_D2_d |
122 |
27 |
GPIO3_D3_d |
123 |
32 |
GPIO3_C6_u |
118 |
29 |
GPIO3_C4_u |
116 |
36 |
GPIO3_B7_d |
111 |
31 |
GPIO3_C5_u |
117 |
38 |
GPIO1_C2_d |
50 |
33 |
GPIO1_C6_d |
54 |
37 |
GPIO1_B0_u |
40 |
35 |
GPIO1_D5_d |
61 |
40 |
GPIO4_A7_d |
135 |
Test GPIO4_B5 for example.
1echo 141 > /sys/class/gpio/export
2echo "out" > /sys/class/gpio/gpio141/direction
3echo 1 > /sys/class/gpio/gpio141/value
4echo 0 > /sys/class/gpio/gpio141/value
5echo 141> /sys/class/gpio/unexport
The tests for other GPIOs are similar to those for GPIO4_B5.
5.14 Video Playback
5.14.1 Built-in playback
The script instruction directory is in /rockchip-test/video/, just run it.
root@rk3588s-buildroot:/# /rockchip-test/video/test_gst_video.sh
Setting pipeline to PAUSED ...
Pipeline is PREROLLING ...
Redistribute latency...
mpp[1392]: mpp_info: mpp version: d4d20417 author: ctf           2024-06-20 chore[cmake]: compile both dynamic and static libraries
mpp[1392]: mpp_platform: client 12 driver is not ready!
mpp[1392]: mpp_info: mpp version: d4d20417 author: ctf           2024-06-20 chore[cmake]: compile both dynamic and static libraries
mpp[1392]: mpp_info: mpp version: d4d20417 author: ctf           2024-06-20 chore[cmake]: compile both dynamic and static libraries
mpp[1392]: mpp_info: mpp version: d4d20417 author: ctf           2024-06-20 chore[cmake]: compile both dynamic and static libraries
mpp[1392]: mpp_info: mpp version: d4d20417 author: ctf           2024-06-20 chore[cmake]: compile both dynamic and static libraries
Redistribute latency...
mpp[1392]: h264d_api: is_avcC=1
Pipeline is PREROLLED ...
Prerolled, waiting for async message to finish...
Setting pipeline to PLAYING ...
Redistribute latency...
New clock: GstSystemClock
0:00:13.5 / 0:00:29.5 (45.9 %)
5.14.2 Browser playback
Select Video file, Right-click and select Chromium Browser to play.
1chromium 4KP60-exist.mp4
5.14.3 Command line
1gst-launch-1.0 uridecodebin uri=file:///mnt/udisk/video/H265_HEVC/I.O.I-Dream.Girl.2160p.UHDTV.H265.ts name=dec ! queue ! waylandsink fullscreen=true dec. ! queue ! alsasink device=hw:0,0
1gst-play-1.0 --flags=3 --videosink="waylandsink sync=false fullscreen=true"H265_8KP30-3.mp4